My Lovely Followers

Saturday 30 January 2016

Distress Ink Colouring Tutorial 1- Materials & Equipment

Hi everyone, I hope you're all having a great weekend. My back is feeling quite a bit better, thank you to all who wished me better.

Since I couldn't really do too much stuff around the house last weekend, I decided that it was a good time to make a start on those colouring tutorials that I promised....ohhh months ago now.

Today I'm not delving in and showing you any actual colouring technique as such, but I am going to go through everything you'll need to start, as sometimes people jump right in and don't have the correct equipment they need, end up very disappointed with  the results they get and then tell themselves that they can't do it.

Honestly, I think that  distress ink colouring can be learnt by anyone.

Before I start I just have to say that the way I colour is what works for me, it may not be the same as other people do it and that doesn't make other ways wrong, you have to use what works best for you. My advice it to learn the basics, look at the various different techniques that people use, and then practise lots, until you find what you like best and what you feel most comfortable with.

So lets start. I've made a video of this too, for those who prefer video tutorials and I'll link that at the end.

So....what materials will you need?

Obviously you will need your colouring medium. In this case since we are using Distress Inks, you will need either 

Distress Ink Markers (this is what I mostly use)

Distress Ink Pads

Distress Ink Refills

For myself I have some of each, but I mostly use the markers and I have the full set. Why? Because they are cheap, easily portable, easy to store and in my opinion the most versatile to use. (We'll go through that later).

If you already have some pads in the right colours, you may wish to start with those to save money buying others, and in fact this is the way I first started colouring in DIs to try it out with little additional cost.

Paper......your choice of paper can make or break your colouring. There are many watercolour papers out there, everyone has different favourites or what works best for them, but I can only comment on what works best for me.

When choosing a paper there are many things to consider. Smoothness, whiteness and absorption.

A Hot Pressed paper will be smother. This doesn't really matter that much when it comes to the end result as you have to get pretty close to notice the difference in my opinion, but if you are using rubber stamps as opposed to digis, it's easier to stamp on smoother paper (no surprises there). The other options are NOT and Rough, which are Cold Presed. You will not want to use Rough.

I use two types of watercolour paper. 

Langton Hot Pressed

or Canson Montval

The Langton is smoother and whiter. However it soaks up the ink really fast, so it doesn't give as much time for blending. You won't want to use a pen to paper method with the Langton HP.  It's harder to erase mistakes also as you can't blot or 'lift' the inl so easily. However it does give a beautiful smooth finish and it's easier to get fine detail with the Langton HP.

The Canson Montval is not as white and a bit more textured (it isn't heavily textured though). What it does have is a special coating that means that unless you drown it with water, it doesn't soak up the ink as fast, giving you plenty of time to work and correct mistakes. It's also easy to 'lift' too much colour or blot out if you have slipped over the lines. It's the only paper I would use the pen to paper method on. It's a bit harder to find in the shops than the Langton (which is available in many places) and I generally buy mine through Amazon. 
This is the paper I would highly recommend for beginners and is also my paper of choice if I don't have a lot of time and need to colour something up quickly. Downsides of the paper (apart from the marginal ones of colour and smoothness) is that because it doesn't soak the colour up fast you have to be careful not to use too much water or you'll wash everything out and it's not as easy to add small details as the colour blends out so easily.

I would recommend buying the smallest pad of each and see which you prefer, or if you can beg a few small pieces of a friend that would be even better. Once you have decided which you prefer, buy the biggest size pad you can afford as it will work out cheaper.

Brushes.

Ideally you'll want Sable, but they can be quite expensive and synthetic brushes also work well. I would however advise buying proper artist grade water colour brushes as you will not get a great result with cheap brushes. You do not need lots. I mostly use a 00 and a 000, though I usually switch to a 0 or a 1 for backgrounds just because it's faster.

You'll need something to keep your water in, this can just be a glass or mug or any container of your choice as log as it's clean.

You'll also need something to put your ink on, such as an acrylic stamping block, but you can also use anything that won't absorb the ink, such as the acetate that comes with your rubber stamps, or a CD case etc. 

Other than that you'll need some absorbent paper such a kitchen roll to blot your brushes wipe excess ink on, and a clear space with good light. I prefer to colour by the window if possible to get good natural light, but as I'm often colouring in the evening after work, I find a good daylight lamp, or using a daylight bulb, is more comfortable and accurate to work under.

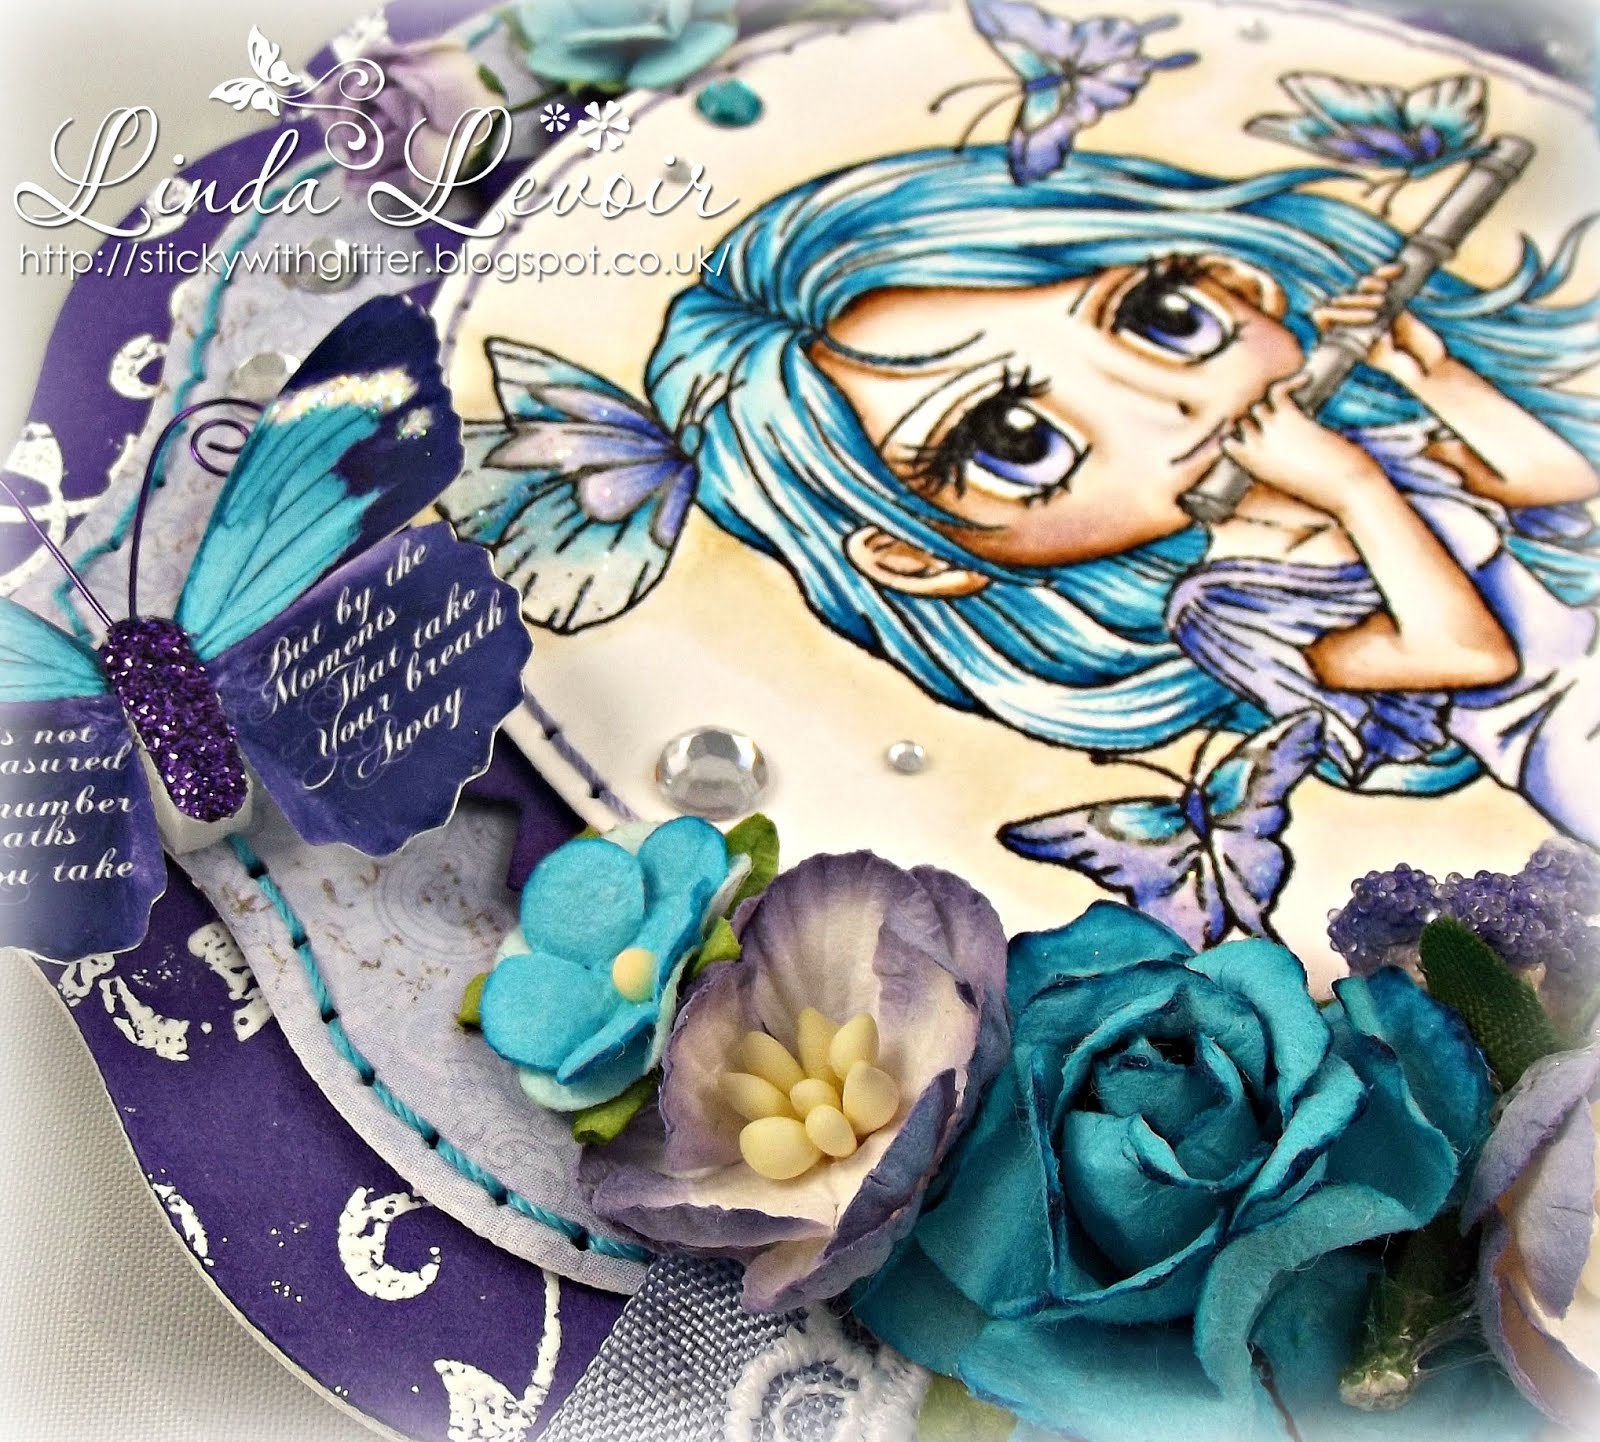
I won't cover techniques here, but I will list the colours I mostly use for hair and skin as this is what we will be starting with, so that you can get your supplies in.

For skin my colour of choice is Vintage Photo. You can use Tea Dye if you prefer a lighter finish, or a combo of Tattered Rose and Vintage Photo, but I find that the Vintage Photo give great shadows and if you keep a light touch and blend well, you can fade out to white for the highlights and won't need to use another colour.

For blush or lips it really depends on my chosen colour scheme, but for the purposes of these tutorials Victorian Velvet works well.

For hair, we'll start with the most common Antique Linen and Walnut Stain which will give you light and dark blonde and also light to medium brown. Hickory Smoke and Black Soot are great for black hair and also for white and black clothing etc.


Any of the green or blue shades would be good for eyes, but we can also use the same as we use for hair to cover hazel, brown and grey.


I hope you've found this post helpful, I will try and complete my next videos by next weekend for you, we'll be covering stamping your image and what inks to use and how to print your digis in Tutorial 1a, and then moving right on to colouring skin in Tutorial 2. I hope you find this useful and I'll be back next week with some more cards.

Happy crafting! :) xx

Thursday 28 January 2016

Cupcake Princess Violet. Noor! Design UK

Hello! I've had such a busy week, still in pain with back and it's my partner's birthday also, so I really don't know which way is up at the moment. So I was very last minute with my project, but I hope you like it.

I've listed all the products I used from the Noor! Design UK shop at the end of my post for you.

I used the very pretty Romance paper pad and I decided to use a lovely Mo Manning digi called Cupcake Princess Violet, that I've had in a folder for ages, just waiting on the right project, I coloured her simply with my distress ink markers. 


Colours used: Vintage Photo, Antique Linen, Walnut Stain, Victorian Velvet, Hickory Smoke.

I had another play with the No End Border Dies and thought they'd be perfect for a 'magic' card, so I made a quick one. 
The image was quite a small one, so I fussy cut her and mounted her on the Circle with Butterflies, such a pretty die. I kept the embellishing pretty simple, just some glitter and pearls and layered in some cheesecloth. The sentiment is from the Paper Art Valentine set. Finally I added some touched of Gesso to help shabby her up a little.


That's all from me for now, see you soon! :) xx


Tuesday 26 January 2016

Art by MiRan Winter Princess - Winter Wonderland at Deep Ocean Challenge

Hi everyone, I'm running a bit late with my card for Deep Ocean's new challenge

Winter Wonderland

It was a hard choice as to what stamp to use, but in the end I plumped for Art by MiRan's beautiful


I coloured her with distress ink markers - Vintage Photo, Spun Sugar, Blueprint Sketch, Shaded Lilac, Hickory Smoke, Tumbled Glass.


I outlined her hair and some of the detailing with my Sakura pen in Clear Star and added lots of Glamour Dust to the snowflakes.

I matched her to some pretty papers from Maja Design and cut the base and the die cut snowflakes and snowflake border from Opalescent card, a bit hard to see in the photos but lovely in real life.


The lace, rolled roses, berries, stamens and gems are all from

The Ribbon Girl

Well that's all from me today, do pop over to the blog to see all my team mates gorgeous makes and join the fun,
and we are are honoured to be sponsored by our new sponsor...
http://www.mariannedesign.nl/

with this fab prize 

I'll be back with you all later in the week.

Have fun!

Thursday 21 January 2016

My Valentine - Noor GDT

Happy Thursday everyone!  It's nearly the end of another busy week for me and one during which I've been fighting off a cold (it hasn't got me yet!) and it's been bitterly cold here too.

So it's lovely to get home in the warm and craft. 

Recently I was contacted by the uber talented Tracy of Crafteezee fame, (I'm sure you're familiar with her gorgeous work), to ask me if I'd do a guest spot on her Noor UK design team. Of course I said yes, so I've been having a play with some fabulous goodies.

I loved this paper pad, the colours in it are right up my street and I love the post marks, which I thought fitted in well with this Paper Art stamp. 
I had the perfect image to go with it too, this is My Valentine from Saturated Canary, this is included in the Buncha Digis set. With that envelope in her hand she was an easy choice to fit my theme.
I coloured her with my distress ink markers in tones that harmonised with my papers.


I cut my card and layers with these great edge dies (so many uses), inked all my edges and distressed my straight edges.

Love these butterfly dies which I teamed up with some Tim Holtz Pen Nibs, to continue my whole love letter theme.


I added some cheesecloth, pearls and flowers.


Finally I added lashings of Gesso and voila!


Wednesday 20 January 2016

WhimsyChallenge


Hi everyone. Just popping by to let you know that we have a new Challenge on the
Whimsy Challenge Blog.

This month the theme is 

With Love

For my card I used the adorable Snowman Love from the new January release.

This is a great stamp because not only can you use it to make Christmas cards, but it's perfect for a winter birthday for a loved one or for a winter anniversary or even quirky winter wedding card.

For myself I made it for my partner for his Christmas card, which is why it's quite plain for me as it's a guy card.


It was very quick and easy to put together.

First I stamped the image with black Versafine Ink onto some Canson Montval watercolour paper.
Then I coloured in my image with my distress markers, no colours this time as I coloured it too many weeks ago to remember them lol! But I chose the markers to match the Pion Paper (Days of Winter) that I used. I cut the image with an oval die and mounted it on some leftover cardstock I had in my stash. I inked all my edges with Pumice Stone Distress Ink. 

I cut the word love from some silver mirri card using the new Scripted Love Word Die die also from the January release at Whimsy, and 2 snowflakes, one with the silver card and a smaller one with the teal.

I glued the design paper to a blank card made with some white heavyweight cardstock and then the teal rectangle and oval image on top, keeping everything flat.

I used a glue pen to glue the word over the top, and cut some small squares of foam tape to adhere the snowflakes, on on top of the other, to make them pop.

Finally I added some glitter (which you can't really see in the photograph and some small gems to finish the card and add a little sparkle.
I've added a list of products used below, with links where I have them.

Products
Black Versafine Ink
Cansan Montval Watercolour Paper
Distress Ink Markers
Pumice Stone Distress Ink Pad
Plain White card stock
Plain Teal card stock

I hope you like it and that you can join in the challenge with us.

That's all from me today but I'll see you all again soon.

Have fun! :) xx


Sunday 17 January 2016

Lili of the Valley - Dainty Dancing Mk II

Morning everyone! I'm here today with an inspiration post for The Ribbon Girls. We have a new challenge and as usual for the 2nd challenge of the month it's Anything Goes - Use Any Image.

 Now I have to say that I had this card in my draft folder and had almost forgotten about it! A while ago I made a card with this stamp and as with many of my cards I sold it on my Etsy shop.  The lady who bought it messaged me to say that she wanted to buy 2 of the card, 1 for her daughter to frame for her room, and one to give to her daughter's best friend.

I had to explain that I only make one of a kind cards, so no two are exactly the same. But I offered to make a very similar card, using different colours and papers, and similar but different embellishments.

This is what I made.


These lovely papers are from Pion Design from an old collection called Fairytale of Spring. I also used some Kraft cardstock.


The stamp is from Lili of the Valley and is called Dainty Dancing. I coloured her with distress ink markers, and edged all my papers in Walnut Stain.
Colours used: Vintage Photo, Antique Linen, Gathered Twigs


The star dies are from La-La Land Crafts. 


List of Ribbon Girl Products:

5 mm Clear Crystals Self Adhesive

So that you can see the subtle changes I made, here are the original and the new card, side by side.


I hope you enjoyed my make for today, and that you can find some time to join in with our challenge. Why not pop across and see the rest of the team's inspiring makes here.
You can win the following lovely prizes

First prize:  £10 voucher for LOTV
Second prize:  £10 voucher for The Ribbon Girl
Third prize:  Mystery prize from Marianne Designs
.

See you soon! :) xx


Friday 15 January 2016

Whimsy Jan Release Day 3 - Elisabeth Bell - Tilly

Hello lovelies! I'm back again for another day of Whimsy new releases, and today I got to play with this little cutie from Elisabeth Bell's Little Cottage Cuties Collection.  I'm sure most of you know that I'm rather partial to Elisabeth's sweet little girls.

This one is called Tilly - Little Spring Helper, isn't she darling?


I matched her to these older Pion papers I had in my stash and coloured her with my distress ink markers to match.

Colours: Vintage Photo, Antique Linen, Walnut Stain, Spun Sugar, Festive Berries, Hickory Smoke, Black Soot.

I fussy cut my image out and decided to make an easel card, I don't make enough of these.

Here's a look at the open card.


Ribbon Girl Products used


Don't forget to pop over to the blog, there are lots of chances to win a prize!

Good luck! :) xx

Thursday 14 January 2016

Whimsy Stamps Jan Release - Murali

Hello everyone, it's a very exciting day today because it's day 2 of the new release over at 
Whimsy Stamps
and today I get to showcase this beautiful new stamp from the Art by Mi Ran collection, called
Murali.

Isn't she gorgeous? 

I was super happy to get this stamp to colour up, and I decided to match her to the colours on a beautiful butterfly embellishment I had in my stash, I thought the sentiment on the wings was so perfect for this image. So I coloured her up in shades of Purple and Turquoise. 


I used my distress ink markers and finding the right shades was no problem at all, I used the following:

Vintage Photo, Victorian Velvet, Shaded Lilac, Blueprint Sketch, Tumbled Glass and Mermaid Lagoon.

Unfortunately matching papers was not so simple. Normally I colour my image to match my papers, but I wanted to  use the butterfly and I had no papers that had both Turquoise and Purple/Lilac. 


So I found some lilac Maja Design paper and then stamped a pattern on the plain purple card, with embossing ink, sprinkled with white embossing powder and TaDa! I'd made some embossed patterned card stock.

Because of all the butterflies, I really did not want to fussy cut her, but then I didn't want to lose any of the image either, so I used the Out of the Frame or Out of the Box technique to die cut her with a Spellbinders Nestabilities circle frame.

I outlined some details of the flute and the butterflies with my Sakura Silver Star Gel Pen and then added plenty of glamour dust to the wings for sparkle.

Some lace, seam binding and flowers and some lovely deep turquoise satin ribbon which I tied into a double bow to echo the shape of the butterflies was just what I needed to finish her.

You can find the ribbon, seam binding and lace at The Ribbon Girl.


To celebrate our new release we want to give our fans some chances to win Whimsy cash! We will be selecting 3 random winners and posting their names on the Whimsy Blog, January 18th at noon ET. Each of those lucky winners will receive a $25 Whimsy Store Gift Voucher.

There are 8 ways you can enter for a chance to win and the best part is you can do only one or two of these or even all eight, totally up to you! The more you do, the more chances you have to enter! So follow the link to the Whimsy Blog to find out what to do....


Thanks so much for joining in the fun with our January 2016 Whimsy Stamps Release!


Bye for now! :) xx

Wednesday 13 January 2016

Art by MiRan - Mechanica @ Deep Ocean Challenge

Hello everyone, I hope you are all keeping well.  Work has been very busy again this week, but I'm looking forward to a little 'me' time in a few weeks as I have a couple of days booked off for my birthday.

After an extended break for the Christmas holidays, Deep Ocean Challenge are back with a brand new challenge for you. The theme is
'Something New'.

Recently (when looking for a completely different image), I came across this beautiful image, well most of you know I'm a bit of a sucker for Steampunk, especially if it's pretty and this really fitted the bill. So my something new is this digi from Art by MiRan. You can find it here.

I coloured her with my my Distress Ink markers on Langton Hot Press watercolour paper.
Colours used were: Vintage Photo, Spun Sugar, Victorian Velvet, Frayed Burlap, Hickory Smoke, Black Soot, Aged Mahogany. I added some metallic touches with a couple of Sakura Gel pens in Clear Star and Gold, which you can see better in the photo below.


I really wanted my card to echo the whole scene in the image, so I used my La-La Land Craft Steampunk Heart Cog dies, some pink roses and some metal screw head and gear embellishments from my stash. I also found some of this wonderful paper from Maja Design, Vintage Autumn Basics which really went so well with the image.


 I added a La-La Land Crafts Steampunk Clock Die behind my image and mounted her on more Maja paper cut with a Die-Namics Postage Stamp Stax die.
I gave the cogs and clock some colour and texture with some distress inks and embossing powder and then some alcohol ink (I used a Copic pen) over the gold and silver embossing.

I really love the way this came out, I hope you do too, this one will be VERY hard to give away or sell.


Do pop over to the blog to see all of my team mates beautiful makes and we do hope that you can join in with our challenge!
We have a fabulous prize on offer from 
a surprise selection of ribbon, trim and embellishments

(may be different to the photo below!)


That's all from me for now, but I'll be back tomorrow with my first make for Whimsy Stamps new release for January 2016! Exciting stuff! :) xx

Friday 8 January 2016

Christmas Candle Tilda - The Ribbon Girl

Good Morning!
I'm sharing a card for The Ribbon Girl DT today.
This is (I think) my last Christmas Card share until I start on making new ones for this year, (hopefully a bit earlier than I started last year).

I used Magnolia's Christmas Candle Tilda, this Tilda is one from 2014, but she's one of my most favourite Tildas of all.


I coloured her with my distress inks to match these lovely Pion Design papers, these are from the Days of Winter collection.  
Colours: Vintage Photo, Antique Linen, Gathered Twigs, Hickory Smoke, Victorian Velvet, Aged Mahogany, Pine Needles, Scattered Straw, Wild Honey, Hickory Smoke.


I used quite a lot of Aged Rose Frantage around my image.


I used some gorgeous Ribbon Girl embellishments, plus a couple from my stash, and finished off with a few small snowflakes from La-La Land Crafts.


I decorated the inside with one of the matching 6 x 6 sheets.


Well that's all from me today, but I'll see you all soon.

Happy crafting! :) xx