My Lovely Followers

Friday 30 June 2017

Altenew - Garden Treasures

Hello!

Well I can't say that I'm sorry to be nearing the end of this week, the weather in the UK has been simply horrid, very wet and grey and even a tad cold! Considering it's July tomorrow that's very poor showing. I expect the sun to pull his socks up and work harder next week, or I'll be having a few sharp words with him.

Anyway, this is a first for me, I've dipped my toe into the waters that are Altenew Stamps. I don't really colour flowers much at all normally, but I've seen so many gorgeous work with these beautiful stamps lately, that I just had to try.
So I purchased a lovely stamp set called Garden Treasuers, that seemed fairly versatile and set to work making a couple of cards. This was actually the 2nd card I made, but I will share the other with you at a later date.

This is what I made, I was pretty happy in all with the result.


First of all I took some Strathmore Bristol Smooth paper and prepped it with my anti-static tool. Then I stamped the larger flower in Versamark ink, and heat embossed it with Altnew Crisp Embossing Powder in Antique Gold. Then I re-prepped and stamped again after masking off my first image with a mask made from a post it note, I heat embossed again, following with the smaller flowers and the leaf. You do have to be a bit careful as the slight tackiness from the post it can get left on the paper and attract the embossing powder if you're not careful. I used my Misti to stamp to make the positioning easier.

Once all my stamping and embossing was complete I coloured the image with my Zig markers.

Once I was happy with the result I set aside to dry while I prepared my background.
I took some Tim Holtz watercolour paper and blended a mix of Worn Lipstick, Abandoned Coral and Dried Marigold, concentrating the deeper pinker colour at the bottom and the lighter orangey peach colour towards the top, getting a nice ombre effect.

Then I sprinkled and flicked some droplets of water, let stand for a few seconds and blotted off with a paper towel. Finally I flicked some gold paint on it randomly and then spayed lightly with a gold Glimmer Mist. This gives the card a lovely lustre which sadly doesn't show up to well on camera. I dried with my heat tool and then left it to completely dry while I prepared the rest of my card.

I took some smooth white cardstock and cut it to 11" x 4.25" scored at 5.5" and folded in half to make my top folding card base/

I fussy cut my stamped and coloured image, this is quite easy when you emboss.

I took my fully dried background and cut it to size with a Double Stitched Rectangle die from MFT Stamps, then prepped it with my anti static tool, and stamped the Thank You sentiment from MFT Stamps'You Give Me Butterflies stamp set and heat embossed with the same gold embossing powder.

I adhered this to my card base with some craft foam in between, then popped my flowers on with some foam tape to give them a little dimension.

Finally I added a few sequins from Lucy's Little Things, Tropical Paradise shaker selection.

I do hope you like my card for today, it's a bit different from my normal type, but I really like it .
 I'm off for a meal and a few glasses of something nice after work tonight with my lovely friend Jane, so I can put the weather firmly behind me.......or at least not care very much about it lol! 

Thanks so much for dropping by!


Thursday 29 June 2017

I Spot a Great Friend

Hello!

I'm popping in with a little My Favorite Things love today. This is another card using the Loveable Leopards set, which is just adorable.

I coloured the leopard on the tree branch this time along with the 3 birds, with my Zig markers, (hese are my favourite, go to colouring medium at the moment), and cut them out with the matching die-namics.

I used some paper from the Sweet Celebrations 6 x 6 paper pad and the Vertical Stitched Cover Up Companion Die-namic to make this card along with some Orange Fizz cardstock.


I used the cloud stencil to stencil the clouds with some Orange Fizz Premium Dye Ink, and stamped a sentiment from the same stamp set onto some Gumdrop Green Cardstock, cutting it out with the narrow banner die from Blueprints 31. I finished with a few jewels from Little Things from Lucy's Cards.

That's all from me today, but I'll be back tomorrow with some inspiration from Lawn Fawn.

Thanks for visiting!


Wednesday 28 June 2017

Lots of Layers at Deep Ocean Challenge

Hello!

I'm having a little break from all the CAS today, with a layered, shabby card for 

For this card I used some lovely Lemoncraft Papers as a backdrop for this lovely Butterfly, made from the Beautiful Butterflies stamp set from MFT Stamps.

I did some ink blending on Strathmore Bristol Smooth Cardstock and then made some small splashes of water and blotted. Once fully dry I stamped on the markings in Versamark Ink and then heat embossed with gold embossing powder. I cut out the butterfly with the coordinating die and then I creased it down the centre to give it some added dimension, placing 3 self adhesive pearls down the body, and then set it aside.

I made a 5.5 x 5.5 inch card base from ivory cardstock, and then cut a piece of 'Just love me' patterned paper a little smaller.  I cut a second piece that was smaller again by about half and inch or so and inked and distressed both pieces.

I cut some of the pink paper out with an old LDRS die Lovely View, grabbed some embellishments and started putting my card together. 

I've listed all the items I used from The Ribbon Girl below, along with links to the items in store.


That's all from me today, but I'll be back tomorrow with some more MFT inspiration.

Thanks for dropping by!


Monday 26 June 2017

Whimsy Stamps - Crissy Armstrong - Penguin Floating

Hello!

I've been super busy this weekend, part of which has been spent planning my teaching for the Whimsy Stamps Annual Craft Retreat over in Florida this October.
If you want more details you can find them here, but if you're thinking of coming you can find the details here.
But don't delay because we only have a few spaces left now!

I did find some time to make a few card, this one though was already 'in the bag'.
A work colleague of mine is retiring at the end of August, and as she has a fondness for penquins, (she has a whole army of knitted penguins she breaks out at Christmas), I thought this penguin, relaxing without a care, was the perfect image for a retirement card for her. It's called
Penguin Floating 
drawn by the super sweet Crissy Armstrong who's drawn a huge selection of penguin images for those of you who love these adorable creatures.

I coloured her up with my zig markers, then masked off the stamped image while I set to with my stencils and distress inks.


I used the Cloud stencil and the Radiating Rays stencil from MFT to create my sky and sun, and blended some salty ocean for my sea.

I cut my image out with a large rectangle die from Blueprints 15 and adhered that to a card base made from deep pink cardstock and then cut a matching frame using a die from the
Whimsy Stamps Shaker Builder - Sweetest Birthday
I cut several of these and mounted them together to get some added dimension.

Finally I added a few clear sequins to finish.

That's all for today, but I'll be back with some more inspiration for you tomorrow.

Thanks so much for visiting!


Saturday 24 June 2017

Fairy Happy Lilac

Hello!

I made another card using the super sweet Fairy Happy stamp set from My Favorite Things, (MFT Stamps).

I kept this really simple, colouring up the fairy with my Zig markers to match my papers. I decided to give her purple hair because....well why not? Her wings do have a lovely sparkle from Wink of Stella, but as per it doesn't show up well in the photo. I do still use my distress markers to colour skin, as I'm not so keen on the colours of the zig markers that I have for that.

I stenciled a very soft background with Shaded Lilac and Cracked Pistachio distress inks, using my Giraffe Stencil to give the appearance of an old stone wall, then adhered it directly to my cardbase, which was made from Wild Wisteria cardstock trimmed to a vertical A2 size.  I cut out 2 of the medium size Pierced Rectangle Frame, from patterned paper and plain cardstock, mounting them on foam tape for dimension and offsetting the green one behind the lilac for interest.


I stamped the sentiment, which is also from the set, in Grape Jelly Premium Dye Ink, I should have used my MISTI for this but I forgot to add it before I glued on all my elements lol, so I had to do it by hand and eyeball it.

I stamped a couple of the flowers from the set and coloured those with my Zigs also and cut them and my fairy out with the coordinating dies, then I mounted them in my frames with some foam tape.

Finally I added a few sequins to finish.

I hope you like my card for today, thank you so much for visiting!


Friday 23 June 2017

You're a Treasure

Hello!

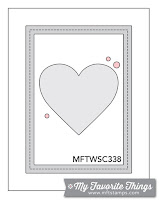
I thought I would join in with this week's Sketch Challenge #338 from My Favorite Things.

I used the Party Like a Pirate set and coloured my images in bold colours with my Zig Clean Color Markers, then cut them out with the matching die-namics.
I used the Cloud Stencil to make the background and the card was cut with Blueprints 31 and Scalloped Frame Die-namics. The paper is the Country Fair Plaid paper pack from MFT.
I added a little bit of gold sparkle pen to my coins and the chest to give them a bit of a metallic sheen.

This is the sketch I followed

Sketch 338 #mftstamps

I've taken some artistic licence and adjusted some dimensions and placement etc., but the basic layout is the same.

Thanks so much for dropping by!


Wednesday 21 June 2017

Lee Holland - Puppy and Present

Hello!

We're having some very hot and humid weather in the UK at the moment, which tends to kill my crafting mojo somewhat, especially after a long hot bus journey home from work lol. Luckily I made a whole swathe of cards when my mojo was running at full speed. 

For this card I used another of Lee Hollands adorable Puppies for Whimsy Stamps' June release.


I again coloured him up with Zig Markers, adding some detail with a white Posca pen and fussy cutting him out.

For my card I took a piece of Tim Holtz watercolour paper and stamped some paw prints with Versamark ink, heat embossing them with white embossing powder. Then I took 3 colours of Distress Inks (Picked Raspberry, Twisted Citron and Peacock Feathers, and blended them over the area I knew I wanted to place my image. I stuck the embossed piece to the front of a white A2 card base and then cut a piece of patterned paper with a border die and glued that at the top. I then rounded all 4 corners with my corner chomper.

I stamped one of the sentiments from the Big Balloon Celebrations stamp set onto some white cardstock, with Onyx Black Versafine Ink and cut it out with the coordinating die.

I mounted my image and my sentiment on my card with some foam tape and finished my card with a few enamel dots.

Whimsy Stamps Products Used

Lee Holland Puppy and Present
Big Balloons Celebrations Clear Stamp Set
Big Balloons Celebrations Die Set
Stitched Border Trio Die
Summer Breeze Enamel Dots

That's all from me today, but I'll be back again tomorrow if I haven't melted!

Thanks for visiting.


Tuesday 20 June 2017

MFT Camp Create - Divine Dry Embossing - Beautiful Butterflies

Hello!

Swinging in super quick with the last of my cards made during Camp Create 2017.

I did not get the time to do a slider or a glitter card for those classes...damn work, but I did manage the bonus class - Divine Dry Embossing.

I made 2 cards using the Beautiful Butterflies stamp and die set for both. This time I didn't use the solid layering stamps, I cut my butterflies with the die and did some ink blending and water spotting on both, stamping the markings in black ink once they were dry.


For my dry embossing I actually used stencils. This is a great way to get more life from your stencils, they really are so versatile. The top one is the Radiating Rays stencil and the other is an older one that I can't remember where it's from.


I also used a few dies from the Blueprints 31 set.

That's another badge ticked off. If you want to join in with the class you can find it here.

I really have enjoyed the classes this year and I'll be sure to join in the fun again next year, looking forward to it.

Thanks for visiting!


Monday 19 June 2017

Holiday Cheer

Hello!

I thought I would kill 2 birds with one stone with this card. 1 I would get another Camp Create class done and 2. In the process I'd check off another elusive Christmas Card lol.

So this is my card for the fabulously titled class- Spectacular Shakers.

If you want to join in with this class, there's still time and you can find it here


I used one of the little penguins from the Toasty Greetings stamp set (my daughter loves penguins so I do try to use some), stamped him out on Strathmore Bristol Smooth paper with Versafine ink in Onyx Black.

Than I coloured him in with my zig markers and cut him out with the coordinating die.

The background of the shaker window is meant to be reminiscent of an igloo wall. I used the English Brick stencil and some blue shades of ink with my Clarity stencil brush for some soft tones. 
Unfortunately the die I cut my aperture with is no longer available from MFT, but you could use an ordinary circle die instead if you don't have something similar.

I used a mix of the Lucy's Lagoon Sparkly Shaker mix and some white sequins from my stash.

The large rectangle die is from MFT Blueprints 15 and the smaller one is from MFT Blueprints 20.

I finished off with a small banner and a little charm and twine.

This is the badge earned from the Spectacular Shaker class.

I hope you enjoyed my card and thank you so much for visiting.


Sunday 18 June 2017

Fairy Shaker at The Ribbon Girl


Hello!

We have a new challenge up over at The Ribbon Girls and as always for our second challenge of the month, it's
Anything Goes with an Image

I made a sweet little shaker card with the new Fairy Happy stamp set from MFT Stamps. I kept the colouring very simple as tbh I'd forgotten the challenge was this weekend and I was in a little bit of a rush lol. The dies used are all MFT apart from the little tag, and that die and stamp is from Mama Elephant.

I used the following Ribbon Girl products to complete my card:


I do hope you can join us, there are the following lovely prizes up for grabs:

First prize:  £10 voucher for LOTV

http://www.liliofthevalley.co.uk

Second prize:  £10 voucher for The Ribbon Girl

http://www.ribbongirl.co.uk/catalog/index.php

Third prize:  A lovely prize from Marianne Designs


Thanks for dropping by!

Saturday 17 June 2017

MFT Camp Create 2017 Days 1 and 2

Hello!

So with the new release from Whimsy Stamps out of the way (I say out of the way, I still have more to share with you in the next 2 weeks, but the release week showcase is done), I thought I'd join in with the Camp Create for 2017 that's been happening over on the MFT Blog.

I probably won't have time to join in with all of them, but I thought I'd try and see how many I could get done.

So I'm starting off with the first 2. 

So just by participating I've earned my first badge below. Takes me back to the days of being in Brownies and trying to earn all those badges for my sash.


For the Day 1 of Camp Create which was Wonderful Watercolour, I created the card below.

I used the watercolour 'smooshing' technique to create the background to give a kind of dappled jungle effect which I thought worked perfectly for my new Loveable Leopards stamp set.


I coloured the leopard and birds with my Zig markers. This was actually the 2nd leopard I coloured and I tried a different combo the first time (I haven't blogged that card yet), but I tried something different for this one and I like this one much better. The colours I used here were Ochre and Light Brown. 

I made the background with 3 colours of distress ink and added water and then when dry I added some drops of water and 'lifted' a little colour before adding splashes of gold watercolour paint.
I stamped a sentiment on some light gold lustre card and popped a little frame cut from kraft cardstock behind to bring the focus on the leopard. I embellished with s few enamel dots in greens.

So that's the Watercolor badge done.

If you want to join in with this class you can find it here.

The next class was Remarkable Resist.

For this class I created the card below. Stamping the Wavy Coloring Book BG and embossing with white embossing powder and using Blueprint Sketch, Peacock Feathers and Cracked Pistachio distress ink, blended over with a blending tool, overlapping the colours and fading to white.


This gave me a bit of a sea themed background for my pirate from the Party Like a Pirate astamp set. 
The cardstock for the matting and banner is actually a dark blue, but it's coming out closer to black in the photo. I heat embossed a white sentiment on my banner from the same set and finished with a couple of the smaller themed stamps from the set and a few sparkle enamel dots.

and that's the remarkable resist badge.


If you want to join in with this class you can find it here.

That's it for today, but drop in again as I'll be sharing my cards for the Spectacular Shaker class and the bonus class Divine Dry Embossing.

Thanks for visiting!


Friday 16 June 2017

Star Princess for Whimsy Stamps New Release

Hello!

I'm back with another card for the Whimsy Stamps June release and this time I played with
 'Star Princess' 
you can find her here.

I kept my card fairly simple, colouring her with my Zig Markers and Stamping a sentiment from the Shine Bright clear stamp set.

I used some diamante embellishments to finish, along with a diamante Star Charm and Diamante Crown.

Don't forget to look out for the rest of the fabulous release for June. I will have more to share with you in coming weeks.

Thanks for visiting!

Wednesday 14 June 2017

Whimsy Stamps June Release Day 1 - Lee Holland - Puppy with Balloons

Hello!

It's day one of the Whimsy Stamps June release and I'm so excited to share with you because this new release is awesome!

No automatic alt text available.


There is so much to choose from, but for my first card I had to go with 
I mean how cute is he?!


I coloured this little cutie up with my Zig Markers and water, I made the balloons 2 tone for a bit of extra interest. Once dry I fussy cut the whole image and then made a little background scene for him with distress inks, a blending tool and some creative masking and trimmed it with one of the 

Then I had the idea of using one of the Balloon Dies from the older Big Balloon Celebrations die set, to cut 3 shapes from Strathmore Bristol Smooth paper and blend some inks over them to match the puppy's balloons. I sprinkled a few drops of water and blotted for some added interest.

I adhered balloons to my inked scene and then popped my image up on top with some foam tape, then adhered the whole panel to the front of my card base with some craft foam in between.

I stamped 'hugs' from the Happy Sayings sentiment stamp set with black ink onto some white card, trimmed it and popped it just behind my image with a little foam tape.

To finish I added a few clear sequins.

I'm proper chuffed with the way this turned out and I hope you love it too.

There's so much to love about this new release, and if that wasn't enough, Denise has a fab offer in store at the moment where you get this fabulous stamp set absolutely free when you spend $75 or more in store.

Image may contain: plant and text

You can find it here.

Thanks for visiting!

Tuesday 13 June 2017

Die Cuts and/or Punches at Deep Ocean Challenge

Hello!

Sorry I've not posted for a few days, I've been suffering a heavy cold and really not much energy or motivation to post. This week will be better though as I have lots of goodness to share with you including the new June release from Whimsy Stamps, starting tomorrow....so excited to share with you, really you will love them!

Anyhooooo.......... onto today's card, which is my DT card for Deep Ocean Challenge.

Our theme this week is Die Cuts and/or Punches.

I used several dies on my card today, the butterfly die, the circle frame dies and the stitched rectangle die, to build a simple but elegantly layered card.


I made an A2 (US) vertical, top folding card base from white cardstock and then cut a piece of patterned paper the same size and adhered that to the top.

Then I took some smooth white cardstock and cut it with a die from MFT Blueprints 20. I stamped a sentiment on the bottom from the MFT You Give me Butterflies stamp set, with Versafine Onyx Black ink.
I adhered this to my card base.  I stamped one of the butterflies from the MFT Beautiful Butterflies stamp set onto white cardstock with MFT Premium Dye ink in Grout Gray. Once dry I stamped the 2nd layer in Coral Crush, and finished with the markings in Versafine Onyx Black. I cut my butterfly out wit the coordinating die.

I used the MFT Stitched Circle Scallop frames dies to cut the double frame for my butterfly layering up several versions of the die to give it more dimension. I centred these on my card and glued them in place. Then I creased my butterfly down the middle and adhered it in the centre of my circles, popping it up with some foam tape for extra dimension.

That's all from me, I do hope you can join in with the challenge, there are always lovely prizes to be won from our kind sponsors.

Thanks for visiting!


Wednesday 7 June 2017

Sea You Soon

Hello!

It's another mermaid card from me today, this set is really getting an outing isn't it?

This time I stripped my card right down till it was almost a one layer card....almost....breathe Linda ....breathe....

I started making a US A2 size card blank with smooth white cardstock and stenciling my clouds and waves with the MFT Cloud Stencil and then added some rays of sun with the MFT Radiating Rays Stencil.

I rounded the bottom corners with my corner chomper and stamped my sentiment in the top left corner of my card with Black Onyx Versafine ink.


I stamped my mermaid and a rock for her to sit on, from the MFT Mermazing stamp set and coloured them with my Zig Markers, using 1 distress marker in Vintage Photo for the skin. Then I cut them out with the matching Die-namics and added them to the bottom of my card with tape and foam tape.

Finally I added some clear sequins to finish.

All stamps, dies and stencils were bought from Dies to Die for in the UK.

That's all from me today, thanks for visiting!

Tuesday 6 June 2017

Lollipop Shaker Card

Hello!

Something a little different from me today and a bit of a change from all the CAS cards I've been posting recently.
I've been meaning to try my hand at a lollipop or wand card for ages, and the other day when I had a bit of spare time I decided to have a play.

I didn't do the concertina bit this time, because I had this fab gathered tulle that worked very well in it's place, and I used some fancy doily type die cuts for my layers. I also decided to make it into a shaker card for a bit more fun, it would be great I think to make one of these like a rattle for a new baby card too.


They aren't the easiest thing in the world to photograph, but I did my best for you.


I've listed all the items used below, along with links to any Ribbon Girl items that will take you straight to the item in the shop.

Plain Pink Cardstock
Pink Gathered Tulle Trim
3 mm White Pearl Bead String (coloured with Copic Ink)
Lucy's Princess Sparkly Shaker Selection

I also used a Whimsy Stamps from the following set:

That's all from me today, thanks so much for visiting!


Sunday 4 June 2017

My Favourite Things - Toasty Greetings

Hello!

I hope you are having a wonderful Sunday, I'm a little sad because I will be going back to work tomorrow and on top of that I'm not feeling very well today, with a horrible cough and swollen glands. Hopefully I will feel better by tomorrow as I have a presentation to give!

Anyhoooo.....I'm here with......drum roll......my first Christmas card made this year!

Yup that's right, I've caved. Although I have shared at least one Christmas card on my blog, early in the year, they were actually made in 2016, so this is officially my first.

I'm blaming Lorraine as she keeps showing so many Christmas cards on her blog that it made me think it was probably time to get my finger out and crack on with them.

I mean even Faye has made a Christmas card or two and she's Christmas phobic this early in the year lol!


So for my card I used the MFT Stamps Toast Greetings stamp set, LOVE this one, it has 2 different snowmen and some penguins too, as well as some smaller elements and some fun greetings.

I used a recent card sketch from the MFT challenge blog for this, I was too late to make a card for the challenge, but I liked the sketch so much I thought I would save it to use it later......or sooner in this case.

I cut out my snowman and fire with the matching die-namics (I normally stamp them colour, then cut, but this is an older set that had the solid dies) and coloured then up with my Zig Markers 
 to match the papers. These are from the MFT Plaid Patterns paper pad.  I cut a piece of this paper large enough to completely cover the front of my card base and glued it in place.

I cut a piece of smooth white cardstock with one of the Basic Scallop Edges dies and then cut a window in the centre of it with my MFT Square Peek-a-Boo Window Die-namics, I did play with the idea of making this a shaker card for a bit, but decided just to go with a window.

I adhered my white panel to the base of my card with a double layer of foam tape and popped the little fire inside the corner, popping it up with on layer of foam tape.

I stamped my greeting on the bottom of my card with Versafine Onyx Black ink and then positioned my snowman, sticking him in place with some more foam tape.

To finish I added a few enamel dots.

All my supplies today came from Dies to Die for

That's all from me for now, enjoy the rest of your Sunday!


Saturday 3 June 2017

Happy Bird-day

Hello!

I made this card months ago now, but didn't share it because it was when I first started colouring with my Zig Markers and I honestly wasn't very happy with the colouring, on that first attempt although I really  liked the card design. So this week when I had some time I re-stamped and coloured the image on paper more suited to these markers (I really like Strathmore Bristol Smooth the best for this), and glued the new image over the old and re-photographed etc.

I'm really happy with the end result and so I'm sharing with you here today.


The stamp is by Paper Smooches from a set called Birthday Buddies and it has a few different critters all with punny sentiments that make him indoors cringe lol.

I made a cloud background wiht my distress ink and blending tool, this was before I bought the MFT Cloud Stencil, so I just made my own stencil with some acetate and a border die.

I placed this behind some smooth white cardstock with a circle aperture cut ot and raised that with some foam tape.

I cut a couple of banners from some patterned paper and stamped a sentiment from the set on one with Versamark ink, heat embossing with white embossing powder, before adding them to my card. My little bird is also popped up on some foam tape and I finished the card with some yellow sequins.

I hope you enjoy my simple card, to think I would have run away screaming from all that white space a year ago lol.

Thanks for visiting!