My Lovely Followers

Sunday 31 August 2014

Blogversary Candy Winner

Good evening all.  I'm back from a wonderful day out and my candy has now finished.  Thank you to everyone who signed up for it, it was lovely to have such a great turn out and I will have a little more Candy on offer once I return from my holiday.

I have let Mr Random do his thing and he has chosen


number 56! That's you Astrid! Congratulations!

Please email me at linda.levoir@gmail.com with your snail mail and I'll get it packaged up and sent out to you (I'm going on holiday on Wednesday, so I'll try to get it sent before I go, if not I'll get it sent out to you once I return on the 8th September).

Thank you again to everyone who signed up and to all my followers new and old and those who leave me lovely comments.  I really do appreciate each and every one of you : ) x x


Blogversary Candy

**This post will remain sticky until 31st August 2014.  Please scroll down for more recent posts**

Good morning to all my lovely followers and visitors.  My blog is now 1 year old (well it's a few weeks older I'm a little late going live with this because I wanted to sort some very nice Candy), it's really hard to think that I've actually been doing this for a whole year now, and when I look back at my first posts I really have come a very long way....I still feel like a noob though!

Anyway to celebrate and to thank all my lovely followers who have joined me on my journey of discoveries in crafting, I'd like to offer some Candy.


It's a bit tricky to see everything in the photo, so I've listed all the items below:

  1. Rubber Stamp - LDRS, Saturated Canary - Breeze 
  2. Rubber Stamp - LDRS, Candibean - Penny's Little Owls 
  3. Rubber Stamp - Magnolia -Tilda with Lovely Lace Shoes 
  4. Rubber Stamp - Magnolia - Tilda with Bunny Balloon
  5. Rubber Stamp - La-La Land Crafts - Paper Doll Marci - Hearts
  6. Rubber Stamp - La-La Land Crafts - Beautiful Day Sentiment Set
  7. Rubber Stamp - La-La Land Crafts -Secret Admirer Luka
  8. Rubber Stamp - Kraftin' Kimmie - Sarah Shopper
  9. Rubber Stamp - Whimsy, Elizabeth Bell - Goldie Locks 
  10. 6 x 6 Paper Pad - My Mind's Eye -Sky's the Limit - Spread Your Wings and Fly 
  11. 6.5 x 6.5 Paper Pad - Kaiser Kraft - These Days
  12. 6.5 x 6.5  Paper Pad - Kaiser Kraft - Rock Pool
  13. 1 Bunch White, Mulberry Paper Roses - 30 mm
  14. 1 Bunch Yellow/White Mulberry Paper Roses - 30 mm
  15. 2  Bunches Purple, Mulberry Paper Roses - 15 mm
  16. Pink, Lilac and Purple Mulberry Paper Gardenias x 12
  17. White, Pale Pink & Deep Pink Cosmos Daisies
  18. Bunch Pink, Mulberry Paper Blossom 
  19. Ribbon, various 
  20. Vintage Seam Binding, Various Colours
  21. Hemp Twine, Various Colours
  22. Variety of Charms
  23. Variety of Diamante/Pearl Embellishments
To enter all you need to do is:

Be (or become) a follower of this blog.
Click on the linky at the bottom of this page and add your details.
Post the pic above in your side bar with a link back to this blog (if you are not sure how to do this I have a small tutorial on how to.  Just click on the Tutorials tab at the top of my page to take you there .

That's it, simples!

Please no Candy only blogs, I will check before I announce my winner : )

Hope you like it.  This Candy will be drawn on August 31st. Good luck!  : ) x x


Aquarius Tilda - Glitter, Gems and Pearls at Totally Tilda.

Happy Sunday everyone! It certainly is for me because I'm off to York today to have lunch at Betty's Tea Rooms with my friend Emily.  I was given a voucher for my birthday and just haven't gotten around to using it yet, so really looking forward to it.  I always love eating there, even if you do have to queue, (and you always do), quite a bit to get in.

But before I rush off to be a lady who lunches, I'm here to share my latest card for the new challenge over at Totally Tilda.  It's dead easy this time so we're hoping to see lots of entries. You just need some gems (any sort) some glitter, and some kind of pearls on your card....and a stamped Magnolia Tilda of course! : )

I chose to use Aquarius Tilda., you can get her from Bunny Zoe's Crafts . I've had this stamp for some time now, but this is the first chance I've had to use it, I thought she would go perfectly with this theme.  I chose Turquoise because she's the Water Carrier and I chose Lilac because Amethyst is Aquarius's birthstone, plus the 2 colours look so lovely together.

The papers are from a LotV pad called Timeless Victorian.  I've inked them all with Walnut Stain distress ink and hand stitched them. The Shape is cut with a Grand Nestie set from Spellbinders, this is labels 1 I think. I popped a little cheescloth behind the layers.


I coloured her with my Copics and decided to colour her hair turquoise too, doesn't it look pretty?  I've fussy cut her out and then mounted her with foam tape on a couple of ovals cut from the  MFT Pierced Oval Stax set. There is glitter all over that strem of water, but it's very hard to pick up on camera, there is also glitter on the beautiful butterfly from Karla's Kreative Korner though that you can see in the photo. I think she looks like she's watering the flowers, don't you?


The cheesecloth, satin ribbon, spotty organza ribbon, lace,flat back pearls and most of the flowers all come from The Ribbon Girl. That beautiful pearl and gem encrusted embellishment on the bow is from The Handcrafted Card Company.


The pearl string is from Live and Love Crafts. The inside is simply decorated to complement the front.


This card is for sale here
This card is now sold

ETSY

I do hope you like my inspiration today and that you join in with us if you can, we're sponsored by the lovely Nikki from

gif maker

and you could win  this


So hop across to the blog for more inspiration from my wonderfully talented team mates, but before you go....there's just a few hours left to enter my Candy giveaway here, so if you haven't entered already, don't forget to do that before you leave!

Take care, I'm off to get ready for my trip to Betty's, see you soon! : ) x x

Friday 29 August 2014

Days of Winter/Kraft for Dies to Die for and A Creative Romance

Happy Friday everyone!  Well I'm so glad that the weekend is almost with us, I've been struggling to shake off this cold all week, thought I'd got rid of it but it seems to be lingering so hopefully I can relax and shrug it off completely with some rest at the weekend.

Anyhooooo on to why I'm here and it's unusual on 2 fronts for me today, firstly because I'm combining my posts, and I think this is the first time I have ever done this as I don't normally like to, but I was so busy and the cold had really put me behind with everything, so it was combine or miss a post completely, so I thought it best to combine.  The 2nd unusual thing is that my card does not have a stamped and coloured image, that's really rare for me, I do it from time to time but I think in a year of blogging this is only the 3rd time that my project does not have a hand coloured image on, but I was in need of saving some time.  Having said that, I really love the look of this vintage Christmas card and it was certainly a time saver, so you may well see more like this from time to time.

Our new challenge over at A Creative Romance is Kraft, so we want to see your creations using kraft card.  I used some kraft card stock for my card base, matting and some of the snowflakes.


As usual I  hand stitched my layers, I also distressed them and inked them with Walnut Stain DI. I popped some cheesecloth behind the layers.


The beautiful papers are the new Days of Winter collection from Pion Design.


There are links to products available in the store at the end of my post.


Products used


Do join in with our challenge, we have a fabulous sponsor this week Live and Love Crafts so you could win a lovely prize from them (both my almost covered lace and my ruffle trim were bought there).

Don't forget to check out my teamies creations here for some fab inspiration, and I'll see you again on Sunday with my card for Totally Tilda.  Take care! : ) x x 


Tuesday 26 August 2014

New Kit Club at La-La Land Crafts


Happy Tuesday everyone!  This is my first ever post for the first ever La-La Land Crafts Club kit release.
If you don't know what the club is hop over here where all will be explained.  I'm super excited to have the chance to work with the club kits, honestly they're fantastic! All the stamps and dies are exclusive to the Club and won't be generally available until a year after the kit release.

This is August's kit and sadly you won't be able to get this one now if you haven't already subscribed, but you can still sign up in time for September's kit and it's going to be just as exciting.

For those of  you who were lucky enough to sign up for this one I have a couple of projects to share today by way of inspiration and for those of you not signed up yet, this will give you an idea of the type of items you'll receive and what you can do with them. Be warned this post contains photos of 2 projects, so it's pretty photo heavy!

So for my first project, I coloured up Marci in distress inks.


All the images and dies used on both projects come in the kit, apart from the large dies used to shape the cards.
Ribbon and lace are from The Ribbon Girl and the papers are from a LotV 8 x 8 pad Beach Bliss.
The gorgeous sparkly starfish is from The Handcrafted Card Company and the seashells are from Live and Love Crafts.

I've popped the distress ink colours I used below for you.

Distress Inks
Skin: Tattered Rose, Tea Dye
Hair Antique Linen, Walnut Stain, Peacock Feathers, Old Paper
Tail and Top: Peacock Feathers, Old Paper, Antique Linen, Brushed Cordroy, Black Soot, Walnut Stain
Shell: Antique Linen, Old Paper, Peacock Feathers, Tattered Rose, Aged Mahogony


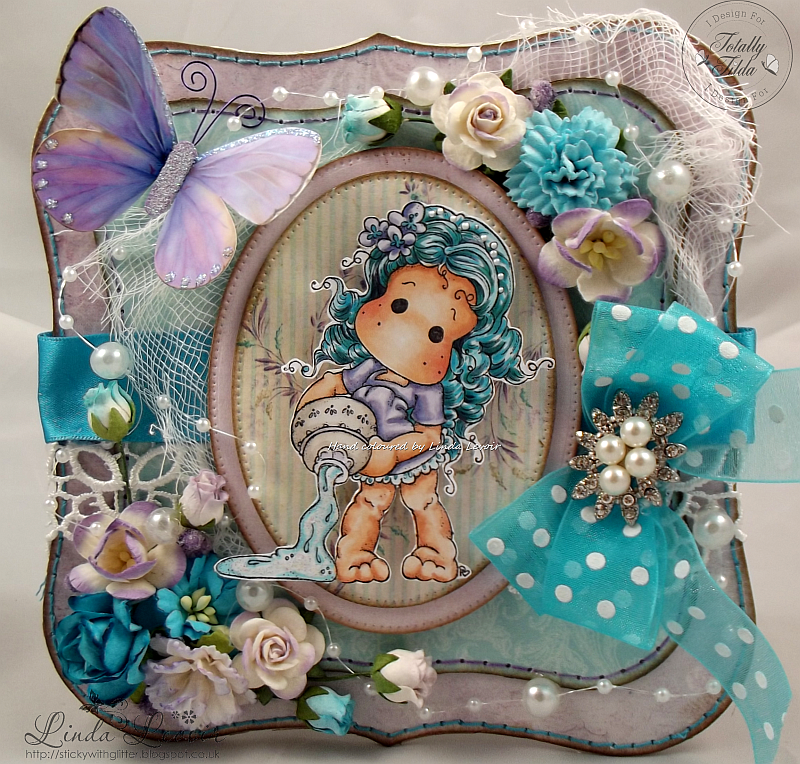
For my second project  I went for a completely different style and coloured Sitting Mermaid Marci with my Copics, this is my first try at doing this kind of stylised colouring, making Marci look like she has some scales, I'm pretty chuffed with the way it turned out.
I have just realised the on the lower 3 pics I took the tag out with the bow attached, intending to photograph it with the card so that you can see it and I completely forgot to put it in the photos!  It's cut out from the Pion Design Shoreline Treasures collection Tags sheet and has a seashell on it.
I thought the paper was perfect for this card and even used a piece to decorate the inside to match.


I've listed the Copic colours I used here:

Copics
Skin: E11, E21, E00, E000, B000, B91, B95, B99, G000, YG95
Hair and Tail: G000, B000, B99, B97, B95, B93, B91, YG99, YG95, YG91
Shells and Flowers: E40, E42, E44, R000, R11, R22

Well that's all from me, hopefully I'll be back on Friday with my posts for Dies to Die for and A Creative Romance, but this cold I've been suffering with has struck me down with conjunctivitis also, so I'm very behind with my makes as it's slow going, hopefully I'll get finished in time.

Don't forget to pop over to the blog to see all the rest of my teamies makes. they are truly stunning and remember La-La Land Crafts also have a Facebook Page HERE and La-La Lands Facebook Group HERE. We love seeing your amazing creations using La-La Land Stamps and Dies too.


Monday 25 August 2014

Artist Marci for Back to School at La-La Land

Happy Monday all, I'm at home today because it's a bank holiday Monday here in the UK, so no work for me today.  Which is nice because it means I have an extra day to fight off this nasty cold before I go back to work and also hopefully get some crafting done.

Today is my final posting as GDT for La-La Land Crafts' Team Monday and at this point I would be very sad except for 2 things - 1.  I shall be rejoining the girls again once my schedule is a little less heavy and 2 the lovely Irina has let me stay on in the meantime as part of the La-La Land Club design team.  What is the La-La Land Club I hear you ask?  Well you can find out all about it here, and tomorrow I'll be posting my inspiration makes for it, so all will be revealed.  Also when time permits you may still see a make for Team Monday from me from time to time when I can fit them in, how great is all that?  I'm very happy because I would miss the girls a lot if I had to leave completely and be a very sad bunny.

Anyway enough of my drivel and on to my make for today.  Now you will have to forgive this for not being my best work but Back to School is one of my least favourite themes, plus I was trying to make it in between all the sneezing, sniffling and wheezing lol, I really wasn't very well.  But I don't think it turned out too badly in the end.

I thought I'd make a little notebook to fit the theme and I thought an artist's notebook would actually be very useful for me as I'm always losing my Colour Charts and notes and I thought I could keep a track of different colour combos I try there too rather then relying on my memory.

La-La Land Products Used:


The notebook was brought from my local Sainsbury's, I can't remember how much it cost but it was pretty cheap.
I coloured Marci with my Copics.

Skin: E04, E11, E21, E01, E000
Hair: E09, E15, E13
Clothing: E40, E42, E43, E44, R35, R37, R59, W9, W7, W5, W3, W2, W1, W0
Easel: E31, E33, E37, E39, W0, W2, W3

 
All flowers are from WOC or TRG.


The gorgeous butterflies are from Karla's Kreative Korner. All other items with a link are listed below.


Don't forget to drop by the blog to see all the rest of Team Monday's makes and you can also join in the fun in our Facebook Group.  Oh and we also have a Pinterest page here!

Well that's all from me today, I'm off to enjoy the rest of my day off, see you tomorrow! : ) x x


Friday 22 August 2014

Happily Ever After - Again at Dies to Die for

Happy Friday everyone! It's Linda here.  If you're in the UK I hope you're looking forward to a lovely long 3 day weekend, so glad I no longer have to work bank holidays like a few years back.

Today I'm showing a wedding card that I made at the request of my daughter's friend, using Tiddly Inks' Happily Ever After ...and yes I know I've used this a few times now, but I actually don't have many 'wedding' or couple stamps and this stamp is on of my favourite images ever.


I used some lovely Pion Papers from the Flower Frame collection. I also paper pieced the brides Dress. All papers were edged with Distress Ink and then hand stitched.


I coloured the stamp with distress inks (apart from a couple of Copics on the paper pieced dress), this is my first try at a slightly darker skin tone with DIs, I don't think it came out too bad, I was concentrating oon it so much I forgot to go back and add some shading to the lighter skinned groom lol.
 I finished her dress with a glue pen and some glamour dust to simulate sequins and beads.
Skin Groom: Tattered Rose
Skin Bride: Tattered Rose, Vintage Photo
Hair Bride: Burlap, Walnut Stain, Broken Twigs, Black Soot
Hair Groom: Antique Linen, Brushed Coudroy, Walnut Stain
Clothing Groom: Pumice Stone, Black Soot
Clothing Bride: W1, W3 and W5 Copics on paper piecing


I mounted the couple on a couple of Pierced Oval frames and slipped a couple of Heart Doily die cuts behind it. Can you spot the little love bird charm nestling beneath the flowers at the top right? I used one of the Fairy Tale Dreams sentiments and the matching die. The flowers are a mixture from Wild Orchid Crafts and The Ribbon Girl.


The white lace is from The Ribbon Girl and that pink lace is from Live and Love Crafts, not sure if they still do it.  The totally gorgeous butterflies with the wonderful sentiment are by Kay Fatula from Karla's Kreative Korner.


I decorated the inside with more of the same papers, the piece with the flower frame makes a lovely place to write a message.

Items used from the store:

Love Birds Charm
Walnut Stain Distress Ink

I'm entering this card in the Tiddly Inks Challenge #139 - Anything Goes

Well that's it from me for today, I hope you all have a wonderful weekend.  I'll be back on Monday with my last post for the La-La Land Crafts Monday DT, but I'm not leaving them completely as I'm staying on for the Club DT (more of that on Tuesday!) and should be rejoining Team Monday in the new year, and I'll still post a project for them from time to time when I have a spare moment.

I'm in the middle of making several projects currently, but I hope to find the time to visit some of your blogs this weekend, I've been so busy I've been neglecting you a bit it should ease up a bit once my holiday is done though and then I'll have a bit more time to visit.

Bye for now! : ) x x

Monday 18 August 2014

Outlaw Luka - Tags and/or Tickets at La-La Land Crafts

Happy Monday everyone, I'm back to work today, so as usual this is a scheduled post and as this goes live I'll be sitting through a day long induction for my not so new job. Finally  my agency days are over and I'll be permanently employed in the post I've been working in  and that means sitting through an induction to tell me how to do all the things I've been doing for the last 2 years! lol.  Still it means all the benefits of permanent employment, so I won't knock it  : )

Anyhoo......today over at La-La Land our theme is Tags and/or Tickets.  I used to use tags on my cards quite a lot back in the day, but I rarely do now, however I do use tickets quite a bit.

La-La Land Crafts items used:


I chose to use Outlaw Luka this time as I had a couple of ticket sentiments I thought would suit him really well and also I have a card to make for a friend's birthday in September and I thought this would be perfect for him as he rides a bike.


I used some Teresa Collins papers, Hello My Name Is,  I really like the writing and patterns on this and think it goes very well with the whole feel of the card.  
I coloured Outlaw Luka with my Copics to match the papers.

Copics:
Skin: E04. E11, E21, E00, E000, R20
Hair: W9, W7. W5, W3
Clothing: W7, W5, W3 W1, B99, B97, B95, B93
B91.
Bike: W9, W7, W5, W3, W1, W0, R59, R46, R35


I used the Wings Set to make my version of a motorbike emblem, I think it looks kind of cool. I used the Steampunk Border die to edge one of the layers, and also the top of the card and added a little bike charm.
The ticket sentiments are from a Whimsy set The Fun Life Tickets 2 and they are cut with the matching die.


I added some Steampunk Heart Cogs around the circle and finished off with some matching Hello My Name is Enamel Dots and Shapes


Finally I decorated the inside quite simply with a sheet from the pad and a couple of bits cut out from other sheets, including this ticket which reads 'Don't Forget You Are Awesome'.

That's all from me for today, but if you pop across to the blog you can see the rest of Team Monday's makes which are also Awesome and don't forget you can also join the fun in our Facebook group here.

I'll be back on Friday with some more Dies to Die for inspiration, until then, have fun! : ) x x

Sunday 17 August 2014

Rose Basket Tilda - Get Well Soon at Totally Tilda

Happy Sunday everyone, hope everyone is well.  I'm been spending a wonderful few days with my daughter this week, sadly she goes home today, though that does mean I can get back in my craft space (a corner of the spare bedroom).

Today we have a new challenge over at Totally Tilda, and this time our theme is get well soon. So we want to see all your get well makes.  This means that as well as your creation having a stamped Tilda on it, it must fit the theme either via the image or sentiment.

I decorated a cute little gift bag to cheer up somebody who hasn't been feeling well.


I used Rose Basket Tilda and these wonderful My Precious Daughter papers from Pion Design again, they are so yummy and versatile. All the papers have been inked with Vintage Photo DI, distressed and hand stitched.


I coloured Tilda with distress inks and cut her out with MFT 's Designers Labels 1


A side view of my basket. The die at the top is the new Lattice Doily Border die from La-La Land Crafts, Tracy should be getting this in stock soon at Dies to Die for.  The flowers are Wild Orchid Crafts, many from TRG and the beautiful lace and both satin and spotty organza ribbon are from The Ribbon Girl

Do come and join us, our sponsor for this challenge is

http://www.simonsaysstamp.com/servlet/StoreFront


and you could win this!


Do pop over to the blog now to check out the rest of the teams makes.  I do have to say the creations for this challenge are fantastic!

Well that's all from me for today, back to work tomorrow sadly, but I'll be back with my scheduled post for La-La Land Crafts.

Enjoy your Sunday! : ) x x

Friday 15 August 2014

Twinkle Toes at Dies to Die for

Happy Friday!  This is my first post for Dies to Die for in my new Friday spot, I've moved from Tuesday since Friday became vacant as it works out a little easier for me with other postings and my family and social stuff.  Talking of family, the card I'm sharing today was made for my beautiful daughter's birthday which was on Monday.  She's 25, blimey that really makes you feel old when your 'baby' turns a quarter of a century lol.

Anyway, this is what I made for her, I thought Twinkle Toes was quite appropriate as she did loads of dancing and dance competitions when she was younger, so she really was a Twinkle Toes hehe.


I used the My Precious Daughter collection from Pion Design (love this collection and also the new Pion Christmas collection which Tracy now has in stock in the store here. Expect a make from me with these new papers soon, they're lush!), I thought these papers were very fitting for a card for my daughter as well as being downright gorgeous. I mostly used the 12 x 12 versions. The beautiful border at the top is cut with the MFT Crown Border


I decided to go with Distress Inks for my colouring medium, though it was a hard choice between that and Inktense Pencils, but as I decided to go for the softer pinks in this collection rather than the purples, I thought the DI suited and matched rather better.

Colours used:
Skin:  Tattered Rose, Vintage Photo
Hair: Antique Linen, Walnut Stain, Broken Twigs
Clothes: Spun Sugar, Victorian Velvet, Black Soot
Shadow: Milled Lavender

She's mounted on some pierced ovals cut with the Pierced Ovals Stax from MFT. I finished her off with a little Glamour Dust and some Liquid Pearls.


I inked all the edges of my papers with Distress Ink in Walnut Stain, before distressing them.  All the layers are also hand stitched with top stitch thread. The little banners on the top left were cut with the Jumbo Banner Stax from MFT. Flowers are a mix of Prima and Wild Orchid Crafts.


I cut a little butterfly and a pair of tickets from the element sheet and added them to my card. The satin ribbon, fabulous pink tulle trim and flat back pearls are from The Ribbon Girl.  The pearl strings were a gift from my daughter and the pearl and diamante heart is from The Handcrafted Card Company


Finally I decorated the inside with a piece from one of the 6 x 6 sheets to match the front and stamped a Happy Birthday to You sentiment from the Impression Obsession  Life Stuff Sentiments set.

Well that's all from me today, I'm off to make Marie-Clair some breakfast now before we head out for the day, but I'll be back on Sunday with my post for Totally Tilda.

Have fun! : )  x x