My Lovely Followers

Wednesday 31 July 2013

Exciting News!

No card from me tonight, though I hope to have something to share with you tomorrow, but I just had to share my exciting news.


After a very busy day at work (we're getting ready for the start of all the new first year doctor inductions tomorrow), I logged in and checked up on my blogs and challenges and....drumroll...I won a challenge!!...and what's more I got top 3 in another! How cool is that?

I won the prize in the 'Anything Goes' challenge at Divas by Design, some wonderful cards entered there and check out those top 4, aren't they fab?  I also placed in the top 3 in the 'Die-ing for it' challenge at ALBC, take a look at the other entries too, there's some really nice ones.

So what a great surprise to come home to, it's sad I know, but I feel like a kid at Christmas lol and my other half was giving me strange looks as I was dancing around the house haha!


Many thanks to the dedicated challenge owners and DT members who put these challenges on for all us addicted crafty folk and I wish you an evening of happy crafting, that's what I'm off to do now! :) xx



Sunday 28 July 2013

Summer Breeze

Another card from me today, I know I should be posting my 'big' project lol, but I got distracted and it isn't quite ready.
I've just got back from a lovely meal with aperitifs and wine, so if my pictures aren't perfect I apologise, no blaming the light or camera today!

There's been quite a few 'summer' type challenges out there recently and it inspired me to use an image I've really liked and wanted to use for a while now, anoyhoo...........enough chat and onto the card.


I thought I'd try my hand at making a pocket or criss cross card for a change as I've only ever made one before.  I kept it fairly simple as my last few cards have been fairly fussy.


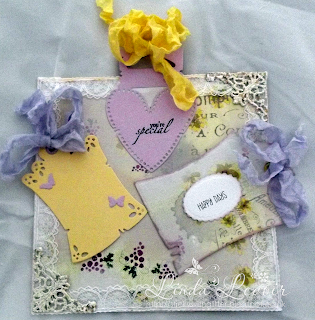
A view of the inside insert plus tags. I soaked the seam binding and scrunched it up and then dried it off with a heat gun. The metal corners have been frantaged with shabby white.


A close up of my image, Cali Girl by Krista Smith coloured in Copics accented with Glamour Dust and Glossy Accents. Isn't she pretty?


The 'arty' shot.


A view of the whole thing. Love that ribbon.

Stuff n Things I used to make this card as follows

Papers:  Magnolia
Image: Cali Girl digi from Saturated Canary
Dies : Doohicky Jolly, So Wrapped Lovely and Bloomy Tags. Spellbinders Floral Oval.
Lace, ribbon, seam binding, pins and flowers:  The Ribbon Girl
Copics: Skin - E000, E00, E21, E11, R20. Bikini and bag - Y00, Y02, BV000, BV11. Hair - E50, E51, E53, E57, E17.
Frantage embossing enamel, Glossy accents, Glamour dust, liquid pearls.

I'm entering this card for the following challenges:


Saturday 27 July 2013

Lovely Dream

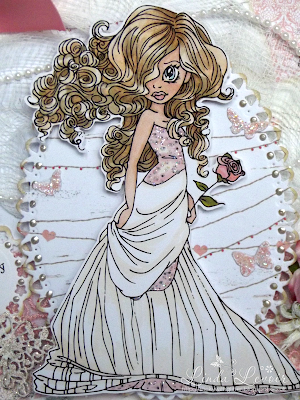
Well today seems to have flown by, but weekends always do don't they?  I've been busy with bits around the house, but I spent a fair bit of it making this card.  I've had the image coloured up for some time waiting to be used and I wanted to make a wedding card with her.  Since this project seemed perfect for the current Saturated Canary challenge - Glamour and Glitz , after all a bride is always glamorous right?


I used my new dies from Go Kreate again, but this time I worked with a square card as a base and used the 3 different sizes of dies for the layers.
The papers are Prima, the Lyric pad.  I've had these for a while but was waiting on a few Copics to match the colour pink which is far more of a peachy pink than the other pens I had.  I love these papers and they were perfect I think for this project.


The image is another Digi drawn by Krista from Saturated Canary , isn't she lovely?  That's what she's called too, Lovely.  It's no specifically a bride, but I think she works really well as one.  now because I coloured her up ages ago and kept her hanging around I don't have a list of the colours I used, she was mostly done in a few Promarkers which is all I had back then. I've added some glamour dust to her, dotted to look like sequins and it actually shows up a bit in these photos, hooray!! There's some on the tiny butterflies too, they were cut with a die from Memory Box. I dotted some liquid pearls in Platinum around the oval spellbinders frame, and popped it on some cheesecloth.


A not so great view of the inside lol, with more of those tiny butterflies.  


The sentiment is from Pink Petticoat I have lots of these though I often don't use a sentiment at all.  The lovely butterfly is from WOC as is the pink rose, I've frantaged it with Shabby Pink.


A close up of the flowers, I gave them a light brushing of white acrylic paint, apart from the larger rose these are from The Ribbon Girl as is the beautiful satin ribbon and both the laces and the string of pearls.

I'm entering this card for the following challenges:

Alphabet Challenge - L is for Lace


I do hope you enjoyed my share today, do leave a comment if you visit I really do appreciate them, and enjoy what's left of the weekend


Friday 26 July 2013

Farewell Tilda

Wheeeee!!! It's Friday!!  Work is finished and I have the weekend to relax and craft....well once I've caught up with all the chores lol.  I hope everyone is looking forward to their weekend as much as I am.

I have a card to share, I made this one for work colleague who's going off to another department soon. and had a few challenges in mind when I was making it.


I used a die from Go- Kreate to make a shaped card.  The papers are from Maja aren't they beautiful?  I'm really looking forward to using some of the others too. I used 2 Doo-Hicky dies to make the tags and Spellbinders oval nesties and floral oval to frame the image.
The papers are distressed with a bit of white acrylic paint and distress ink in Antique Linen.
I added a doily between the 2 shaped layers and a small amount of cheesecloth under the oval.


The image is Farewell Tilda from the Bon Voyage collection.  I've coloured her with Copics:
Hair: E50, E51, E53 & E57
Skin: E00, E21, E11
Dress, Apron & Boots: B000, B12 & B14, W0, W2 & W3
I've added some glamour dust to the image and some liquid pearls around it.


The Farewell stamp on the tag is by Magnolia, the flowers are from WOC and The Ribbon Girl and the blue seam binding and wooden heart button is also from The Ribbon Girl.
The lace is from stash I think it was recycled from an old outfit!
I gave the flowers and button a light coating of white acrylic and added a few pearls to the corners.

I haven't posted a photo of the inside as it's fairly plain to allow a few people to write a message inside.

Well I hope you like my share for the evening, I plan to use some of my time this weekend catching up on people's blogs, I've seen some lovely cards this week but I just don't seem to have had the time to make many comments so something to catch up on this weekend.

I'm entering this card for the following challenges:


Thursday 25 July 2013

Yummy Icecream

Yup, don't faint, this is 2 cards in one evening from me lol.

Sometimes I work on a couple alongside each other and at the moment I'm gradually working my way through an additional project which can't be all completed at once.

I often take my images into work and colour them at lunch time, since I have a limited amount to craft...but it's Friday tomorrow and soon to be the weekend which means lots of crafting time!!

Anyhoo...on with the card.

Firstly I must apologise for the quality of the pictures, the light was starting to go as I was taking them, I really must invest in a decent lamp...another thing to add to the ever growing wish list *sigh*


I really like the way this turned out, just a shame the photos don't really do it justice.  The backing papers are First Edition and Magnolia (on sale again...yes I'm a cheapskate lol) I've used a metal corner from WOC which I've treated to some Frantage in aged rose. The corner die I used is from Whimsy, I had real problems getting this to cut cleanly, I'll try with thinner cardstock next time and see if that makes a difference, but I had to cut this 3 times before getting a good result.


The image is Sweet Treat Wryn by Tiddlyinks. Such a cute image and perfect for the challenges I'm doing.  I've coloured her with Copics and embellished the ice cream with some glossy accents which looks realy cool, but sadly doesn't show up on the photos.


I added a little frantage to the inside and outside frames. The sentiment is from Pink Petticoat  and I hand cot the banner shape and covered it with glossy accents to make it hold it's shape and shine.


The ribbon is from stash and the flowers are from WOC.

The starfish is one of a collection of novelty buttons I pick them up here and there, I just cut off the back and glued it on, it was the perfect colour to go with the card too.

I want an ice cream now and sadly I have none in my freezer! 

Thanks for popping by and enjoy the rest of your evening....with ice cream if you have some! xx


Hope you like my summer card, I'm entering her for the following challenge:


New Baby

Before I share my card I'd just like to share some exciting news, ....I won a prize in a challenge!

Just a random pick, so I've yet to display any prestigious badges (hopefully some to come in the future), but still very exciting.  It's for a £10 voucher for The Ribbon Girl and I have to say a big thanks to Rina at Marvellous Magnolia for running these challenges and to all the design team for all their hard work on the inspiration cards.

Ok...on to the share....
Today I'd like to share a card I was asked to make for someone at work for their friends who are having a baby girl.


I'm always a bit nervous when I'm making a card for somebody else to give, even if I really like something, I can't be sure they will and obviously I've never met the people it's going to which makes it even more difficult to judge.

Luckily she loved this and thought her friends would too.


The image is called Wee One, it's a digital stamp by Sylvia Zet and is available here, all her images are sooooo cute and so nice to colour.
I used Magnolia backing papers, these were bought on sale, I do love a bargain lol.   The butterfly and the metal corner are from WOC and they've been given a dose of frantage in shabby pink.


I've coloured her up with my Copics and decorated with liquid pearls.


More of those lovely papers inside, the die cut is a Spellbinders nestie, lacey square I think.


A close up of my bow and flowers.  The flowers are from WOC as usual and the button and the beautiful lace is from The Ribbon Girl and the ribbon is from stash.
The die cut at the top is Butterfly Border from Joy! Crafts, I glittered it with Glamour Dust.  The sentiment which is personalised I made on my computer and the whole is decorated with a few pearls (I buy these when I'm getting low from whoever I'm ordering from at the time lol).

Well that's my card, I hope you like it and hope the new parents love it.  I'm entering this for 


Wednesday 24 July 2013

Wild Orchid - Purple


Very quick post from me, just sharing my quite late entry for the Wild Orchid Challenge.  Not my best work, but I've been working on a couple of other things so didn't get a lot of time for this.


Anyhoo....enough about that and on to the pics...


The papers are Magnolia, and I used a Joy Crafts die, Butterfly Border .


The image is a Sugar Nellie digital stamp, coloured with Copics, I coloured her up a while back and she's been sitting waiting to be used so I'm sorry I don't have the colours to hand.  I added quite a bit of Glamour Dust, it never really shows up at it's best on photographs though.


The flowers are from WOC and I used ribbon from stash. the butterflies are cut with an X-cut punch I bought in Hobbycraft.


I hope you like it, I do love these Sugar Nellie fairies, I should colour up some more, but then again I have a lot of other stamped images just waiting to be coloured lol.


I'm entering this card for:


I'm off to tidy up my craft area and then get some sleep, work tomorrow and sadly not Friday lol.


Night night xx

Tuesday 23 July 2013

Ribbon Girl Giveawy


Very quick one from me as I've been working on a big project for my boss at work who's leaving for pastures new after 13 years with the Trust.  I'll share it on here when it's done but it will be very photo heavy to fit it all in lol

Anyhoo... just to say the The Ribbon Girl are having a great giveaway in honour of the new royal baby.  It's a wonderful selection of goodies and you can find it and enter here

That's it from me, not sure I'll get time for anything tomorrow, but I hope to have something to share on Thursday, and then hopefully the big project (not a card) will be finished at the weekend and ready to post.

Happy crafting! xx

Sunday 21 July 2013

Pretty in Pink


Good afternoon, we've certainly had a change in the weather here in Leeds, it's cool and overcast today and I must say that much as I like the sun, this is much nicer weather for crafting.


Apologies for not posting again yesterday as promised, I didn't actually realise what the time was at the time of posting and the day simply ran away with me.


Anyhooo..on to the card.....

I bought this stamp simply because it was so pretty I thought I'd probably end up using it a lot.  So wanting to use her and not having an actual card in mind to make at the time I turned to some current and new challenges and designed a card with those in mind and ended up finding 6 that inspired me that I could use together on one card!

This is the card I ended up making.  Doesn't she look sweet?


This was my first proper go at using Frantage and honestly I can see why people use it lots, it's very addictive, I had to control myself, it's so much fun, but very frustrating when it blows away lol.

I have to give a big thanks to Tracy Payne for her excellent tutorial on how to use this stuff, it gave me the courage to give it a try, thanks so much for sharing that Tracy. 


I coloured Tilda with copics: Skin E00, 21, 13 and R20 for the cheeks.  Dress and shoes R81 & 83 and RV10. Hair E50, 51, 53 and 57


I cut the image out with a Spellbinders nestie circle and backed her with a small paper doily. I used some small white feathers behind the flowers.  DP used was Magnolia which I distressed with a Tim Holtz tool and gave an edging of white acrylic paint.  I used a large white doily and cut another layer of paper with a Spellbinders labels 1 die.


Flowers used are mostly from WOC as is the crystal stem.  The label here is a DooHicky one and the sentiment is from Pink Petticoat this one is useful as I didn't make the card with an event in mind as it can cover various different occasions.


 The Pink heart tag is cut with another Doo Hicky die, love these,  the little clay heart is from LLC and I've frantaged it with Shabby Pink as before.

Ribbon is all from stash.

I hope you enjoyed my first real venture in frantage and shabby chic, the challenges I made this card for are as follows:


That's all from me for now, enjoy the rest of your weekend, and if you've made it to the end her, do please leave me a comment, I do read and cherish every single one xx

Saturday 20 July 2013

No Designer Papers

Good afternoon, I hope you're all enjoying your weekend so far.  I'm feeling much more comfortable now the blistering heat in the UK seems to have eased up today, it's warm and pleasant but comfortable, unlike yesterday where I felt I was going to melt all over my desk, I felt very sorry for the guys upstairs doing the resuscitation training!

Anyway, since I could craft pleasantly today without getting all sticky I thought I'd share a card I've made for the latest challenge at A Creative Romance, 'No Designer Papers' .

I could have gone with a CAS stamped and coloured image or maybe white on white with die cuts and flowers, but I decided to try something a little different.

I'd seen a tutorial for a 3 tier card a while back and tried my hand at a simple version, and I thought it would be perfect for this challenge.  A tiered card is where you cut the layers you are going to stamp and then arrange them on top of each other with low tack glue and then stamp over the edges.  Then you mat each layer and stack them with foam pads to give a 3D effect. 


 I have to say I was really disappointed with the way this photographed.  The large butterfly is stamped with a pearlescent ink but the effect which is quite lovely on the card, doesn't show up at all on camera, but that may just be me being an unskilled photographer working in makeshift conditions, the glamour dust isn't making it's presence known either lol and the gems are not exactly twinkling sigh...anyhoooo...enough moaning from me!
I made the card quite large to try out the technique more easily, I'd probably go with a standard 6 x 6 next time.  I have no clue what make the stamps are, I picked them up as an impulse buy on a visit to hobby craft and usually use them to decorate the edges or insides of cards etc.


I added a metal corner and sweetheart blossoms, cosmos daisy and rose from Wild Orchid Crafts .  The corner has been embossed with a mixture of shabby pink and aged rose Frantage from SirStampaLot . You can just about see the glamour dust on the black butterfly in this shot lol


I also added frantage to the metal butterfly and more flowers, both from WOC again.  The sentiment is from Pink Petticoat, you get loads and this one is nice in that it doesn't have to be for a birthday.

The butterflies around the edge of the top tier are cut with Butterfly Border I just split it into two parts and then mad with the frantage again hehe.


The ribbon is from stash and I finished off with a few pink gems.

I hope you like it and I apologise once more for the quality of the photos, I will have to practice more or invest in some lights lol.

Thanks for visiting and do please leave me a message, I like to know you've been and drop by your blog in return...and if you don't have a blog, leave a message anyway, I love to read them and no I'm not talking to myself.

I'll be posting another card later today so pop by again.

Hugs 


Tuesday 16 July 2013

Tilda Skating

Evening folks.  It's been scorching again here in the UK, even up here in Leeds, I thought my brain might explode today I was so hot lol, it would help if the windows at work would open more than 6 inches I guess.

Anyway looking at this card makes me feel a little cooler...in my mind at least!!


 Yup, another Christmas card, I'm so organised this year lol!  
The silver spider web behind the image I picked up somewhere on my travels, the paper is Sweet Christmas Dreams - Sweet Flurry Blue, the lace and vintage binding is from The Ribbon Girl and the label die is Magnolia Doohickey Die - Jolly Labels from Dies to Die For


The image is Sweet Christmas - Ice Tilda from Sir Stampalot  their delivery service is fab...free if you've ordered over £40 and always arrives the following working day, no waiting for your new goodies.  I've coloured her in Copics, I'll post the colours later when I go remind myself what they were.


As you can see I made an easel card this time and used the same label die for my sentiment on the inside, sorry the quality of the pics is not the greatest, the light was starting to go a bit by the time I took them.


The snowflake die is one I've had for a while, it's by Marianne Design and I think you can still get it.  I used it to make my first ever handmade cards last Christmas, which took me forever...but I was new to crafting cards and I didn't start early enough by far either.  As you can see I'm starting early this year hehe.

I hope you like my effort, please leave me a comment if you come visiting, I'm starting to feel quite lonely lol!  I'm entering this card for the following challenges:


Thanks for dropping by *hugs*

Sunday 14 July 2013

Belated Fairy Heartfelt

Good morning folks. I was up and about early today with the sun shining through my window, so I have already tidied up,  got all my washing done and pegged out and finished a card , photographed, uploaded and edited it, get me!

I made this card fairly quickly for a birthday at work, I only found out on Friday that it's their birthday today, so I'll have to take it in tomorrow.

 Paper is 'Sweet Rainbow' Bumble Bee by Magnolia from Dies to Die For
The fuchsia spider's web behind the image is from The Ribbon Girl as is the little wooden button.

The image used on the inside of the card is from Pink Petticoat, I have a collection of these and thought it went perfectly with the paper and main image and of course the sentiment was exactly what I needed.

Image on the front is Fairy Heartfelt is by Christy Croll and is a digi from Tiddly Inks.  (I do have some rubber stamps for inking by the way, I just generally prefer to buy digis where possible as I can collect more due to the cost and storage factors.)
She's been coloured with Copics (R81 & 83, E00, 11, 50, 51, 53 & 57, Y00 &02 and I darkened the edge of her skirt with a Promarker in Sunflower.


Flowers are from The Ribbon Girl and WOC , all other embellishments were from my stash.

I hope you like my effort, I was quite pleased at the way she came out and I'm entering her for Tiddly Inks  Challenge #113 Fairies and Mermaids.

Now to to do the boring bit of making a box for her!

Have fun folks, and if you're in the UK don't forget to use some sunscreen, I'm predicting a few lobsters at work, myself I'll be staying pale and interesting lol

xx