My Lovely Followers

Showing posts with label memory box. Show all posts

Wednesday, 15 February 2017

Happy Birthday to You

Hello!

I had a little bit of a shopping spree at Simon Says Stamp recently, (well it was my birthday recently), I've never bought from there before and I normally wouldn't pay the shipping from the States, but they had a few exclusive things that I really wanted, some of which I've been looking at for a while now, so I made one big order.

Part of my order was this background stamp,  (you will have seen another SSS background stamp on my card from yesterday), clear stamp set and matching die. I've listed the products at the end of my post along with a couple of MFT and Memory Box dies I used if you want to take a peek.


So how did I make the card?

Well first of all I used the background stamp with some Versamark Ink on some watercolour paper and then used some white embossing powder and heated that till shiny. Then I did some emboss resist, blending some distress inks over with my blending tool. I used a combination of Blueprint Sketch, Cracked Pistachio and Twisted Citron. Once I was happy with my blend I wiped the whole thing over with a piece of kitchen towel to clean up my white embossing and make it nice and bright.
I sprinkled a few water droplets onto my finished panel, waiting a few moments before blotting and lifting some of the colour. Then I took some Lindy's Stamp Gang spray in a metallic green and just flicked a few drops from the end of the nozzle tube and left it to dry.

I then cut a piece of silver miri card a quarter inch smaller then my card base and cut out the centre with a postage stamp die. I used the same die to cut my stamped and blended paper and then inset that into the miri card gluing the whole thing to my card base.

With the centre of the miri card that wasn't used I cut out my word, cutting another 3 from plain white cardstock and gluing them all together with the silver on top to make a nice dimensional word.

I then cut my banner from a piece of plain white cardstock and stamped and embossed my sentiment embossed with versamark and some silver embossing powder.
I cut a 3 and a 0 in some light green cardstock that complemented my blending and glued that in the bottom right corner. Then I positioned my word and banner on my card, when I was happy with the placement I adhered them in place and added a few sequins.

I like the way this turned out, and although it looks fairly simple, it felt really creative to make.

Items Used

SSS You Matter Background Stamp
SSS You Matter Clear Stamp Set
SSS You word die
MFT Stitched Sentiment Strips
MFT Postage Stamp Stax
Memory Box Classic Numbers

I'm entering the Simon Says Stamp Monday Challenge - Use Your Favourite Tool (die cutting machine)

Thanks for dropping by!


Friday, 12 June 2015

Skinny Mini @ Dies to Die for

Hi everyone! I really should have posted this last Friday, but after coming back from holiday with a nasty cold virus I just lost all my mojo at the start of last week. Felt much better at the weekend so I whipped up this.

This was such a fun little project, I found the inspiration for this from Ginger at My Sisters Scrapper and she linked to a tutorial she followed from Papercrafter 45 and that's what I mostly followed to make this, (I've included the link for you).  However the original mini measured 8.5 inches long and I really wanted to use up some of my 6 x 6 papers, so I adjusted the length. So I guess it's a short skinny mini :)

One thing I really loved about this project is that it doesn't use chipboard. I like chipboard but I hate wrapping it, plus not everyone has chipboard to hand or wants to buy it just to try a project, so this is a nice one to try because you can just use the kind of stuff you use on your cards.

Anyway, this is what it turned out like.


It's really difficult to photograph these, so I made a short video to show you the pages a little better.


I used Miss Teagen Sue from Bazill Basics. I've had this collection for a while and I've made a couple of cards with it so I really wanted to use it up. This project was perfect for that as it doesn't take as much as a regular mini album.  I was a little short on pages though, so I did supplement with half a 12 x 12 page of Bo Bunny Double Dot paper, but as I say I had already made 2 cards with the pack previously.

If you wanted to you could make this mini with A4 card, but you would need to cut the measurements for the width down by a smidge, (a bit more complicated then cutting the length down due to all the folds and the scoring) but I used A3 card so was able to do the full width.

I edged everything with Walnut Stain distress ink.

The tutorial for this mini can be found here

and the original inspiration from My Sister's Scrapper can be found here

That's all from me today but I'll be back on Sunday with another make to share with you. Enjoy the sunshine! :) xx

Tuesday, 5 August 2014

Vintage Violet at Dies to Die for

Happy Tuesday crafters!  I'm very happy to be here today to share my inspiration post with you because I really love the way this turned out, you know how sometimes you see something on someone's blog or FB and you think, wow, I would love to be able to make something like that....well when I finished this card I felt almost like that except it was my own work!  I hope that doesn't sound too vain, I'm just sooo happy with this one, it really is one of my best ever works (in my opinion).

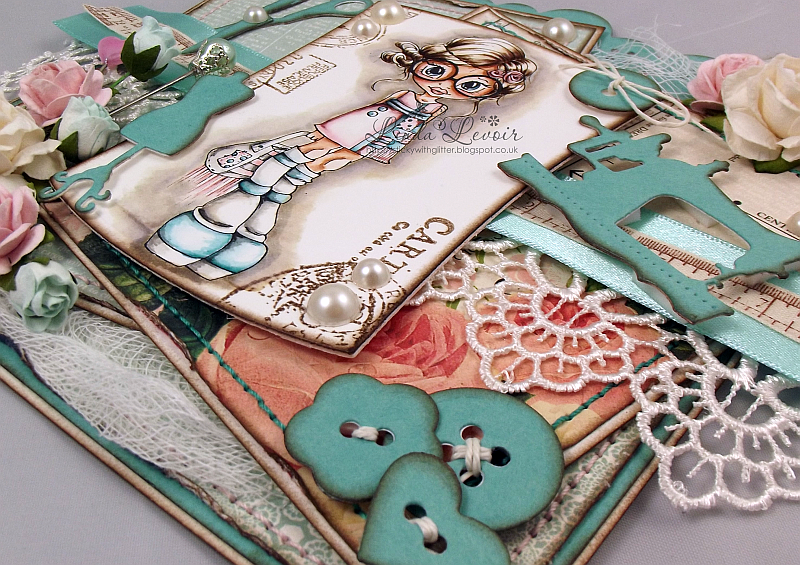
Soooo what did I make?  Well some time ago now Tracy sent me some lovely Carta Bella papers, Sew Lovely  and though I really like them, I really wasn't coming up with any inspiration for using them.  Then more recently I received a die set Stitched with Love  by Taylored Expressions in my DT pack to play with, I decided they were made for each other and put them together with Vintage Violet by Saturated Canary from Little Darlings Rubber Stamps.  Now I know there's nothing on this stamp to do with sewing, but she always makes me feel like she puts her outfits together from vintage buys on an old sewing machine.

Anyway, here's what I made putting them all together.


I also added a Memory Box Button Border at the top of my card. I've distressed and inked all my papers and hand stitched them with top stitch thread. Violet is coloured with distress ink, pads and markers.
Colours used:
Hair: Antique Linen and Broken Twigs
Skin: Tattered Rose, Tea Dye and Vintage Photo
Clothing Spun Sugar, Victorian Velvet, Peacock Feathers, Black Soot
Shadow: Pumice Stone.

I cut her out with a Spellbinders Reverse Wonky Rectangles nestie and popped a little cheese cloth behind my layers.


 The Satin ribbon, lace, flowers,pins and pearls are from The Ribbon Girl and the tape measure ribbon is by Kaiserkraft and was a gift.


I cut all the dies cut pieces from a sheet of Bazill Basic, I'm sorry but I can't remember which colour this was, and then backed them with plain white card stock, this makes them less bendy.


I hope you like my make for today as much as I do, I only hope I can do as well on the next one!!
Just to let you know that from next week I'll be saying 'Happy Friday' as I'll be changing my posting day for Dies to Die for from a Tuesday to a Friday as this evens out my week a little more.
That's all from me for today, but I'll see you again next week, have fun! : ) x x

Sunday, 25 May 2014

Tilda in Lace Pants for Totally Tilda

Good Morning and happy Sunday!  If you're in the UK I hope you're enjoying your bank holiday weekend too, though I hope you're having better weather than me, torrential rain and freezing cold yesterday, I had to resort to putting the heat on and there's only one week till June! Still, at least I did manage to get some crafting done.

I'm here today with my DT post for the new challenge over at Totally Tilda, and this time we want to see Black. White and one other Colour.  You can of course use normal skin tones as well, so really a pretty easy one this week.

I've had this gorgeous paper in my stash for a while just waiting for this challenge as I thought it was perfect. One of the pages from the pack has a lovely lace pattern, so I thought I'd colour up Tilda in Lace Pants from the newest Magnolia collection and paper piece her 'Pants', it always makes me giggle a little when I see trousers called pants, cos here in the UK pants are underwear, so lace pants to me would be something pretty from Aubade lol.


The paper pad I used  is Elegant from Authentique and I used quite an ornate die Palace Oval Frame from Memory Box to mount her on. All layers have been distress with Black Soot DI and hand stitched with top stitch thread.


I coloured her up with my copics, I'm sorry I don't have the exact colours noted, but they would have been the Ws and the BGs and my go to skin colours which you can find on any of my posts with Copic colouring.


Flowers are from Wild Orchid Crafts and The Ribbon Girl.  The bow is made from satin ribbon also from The Ribbon Girl and the beautiful cameo is from The Handcrafted Card Company. The gems were clear, I coloured them to match the paper/image with my Copics, I love that you can do this.


Isn't this butterfly gorgeous?  They're handmade by a lady called Kay Fatula and come all the way from the US.  You can find them in her Etsy shop here, she's lovely, do drop by her Facebook page too and give that a like if you're on FB.


Finally I decorated the inside to complement the front (or and for those people who told me I spelled complement incorrectly and it should be compliment,  compliment is when you express admiration or praise, complement is when something enhances or improves the overall effect. If you're interested in grammar....and yes I can be a grammar nazi lol.....you can check it out in the Oxford Dictionaries blog here. I love language it can be so interesting....but also so confusing he he)
I'm entering the following challenges:

Magnolia Mania - #91 Paper Piecing
Addicted to Stamps #83 Bingo (lace, metal (the cameo setting), flowers

This card is for sale in my Etsy shop .

I hope you enjoy the rest of your Sunday (and bank holiday weekend if you're in the UK) I'll be back on Monday with my post for La-La Land Crafts and in the meantime go check out the rest of the team's creations, here they're flippin' gorgeous!

Bye for now! : ) x x 

Monday, 5 May 2014

Sassy Princess Marci - La -La Land Crafts GDT


**CANDY ALERT** You still have 10 days left to enter my Blog Candy giveaway here.

Happy Monday everyone! Here in the UK we are enjoying the May bank holiday, so no work for me today Yay!. Hope you're all having a great day too. 

I'd like to say a huge welcome to all my new followers, I hope you all find something you like here, and do please feel free to ask questions.

Before I get to the reason I'm here today I'd just like to announce that I've been asked to extend my original 2 months Guest Design Team spot at La-La Land Crafts, for another 3 months till the end of August!! I'm so excited and happy to stay on with this wonderful and FUN team for a little bit longer.

So this week the theme in La-La Land is 'For a Special Lady'. In America and Austrailia, Mother's Day is the 2nd Sunday in May, so I guess for some of the girls, this would be their special lady. But for me in the UK, Mother's Day is on Mothering Sunday, and so has already been and gone. So I figured that every lady is special in their own way, and we should all get to be a princess, at least in our own heads lol, so I made a princess card. 

I used the following La-La Land Crafts items:

Stamp: 

Dies:


I've added links for products used that are available in the UK at the end of my post as usual.


LLLC certaining doesn't have a shortage of princesses, there are 4 different ones to choose from!! I chose Sassy Princess Marci, isn't she a complete doll? I paired her up with this very ornate Memory Box Die, and then made it more decorative by the addition of a crown (obviously!) and a set of wings cut with LLLC dies from glitter card. The paper is by Inkido.

She's coloured with Copics:

Skin: E0000, E000, E00, E11, R20, R11
Hair: E50, E30, E31, E33, E37
Outfit and Crown: BG10, BGBG13, BG15, R00, R12, RV42, YR20, YR21, YR24


I popped her out on foam and added some pearls and bling to her crown.


Some beautiful flowers from The Ribbon Girl and Wild Orchid Crafts and a very blingy crown nestling among them. The inside was decorated simply with a coordinating paper from the set.

I do hope you like my share for today, do hop over to the La-La Land Crafts Blog here to see the rest of the team's makes, they really are terrific and sooo creative, and don't forget that you can join us on Facebook  and Pinterest

Well that's all from me, enjoy your Monday, and I'll be back tomorrow with Dies to Die for goodness, happy crafting! : ) xx


Tuesday, 29 April 2014

Summer Fairy at Dies to Die for

Good morning and Happy Tuesday to you! I'm here with my Tuesday post for Dies to Die for.  If you popped in on me yesterday, my creation today is just about as different as you can get.  It's not very often that I use really bright colours, but these papers just cry out to be used and hey, she's called Summer Fairy after all. Besides, the last time I used her I coloured her in black & white with just a hint of pink, so it was nice to do her in colours this time.

The papers are a mix of 2 different MME pads, links to products can be found at the end of my post as always. The quality of these papers is lovely to work with.


I coloured her with Copics which are think are the best choice for bright colours and decided to get funky with her hair.  Her hair is absolutely wonderful to colour up, such fun!


Skin: E0000, E000, E00, E11, R20, R11
Hair: BG10, BG11, BG23, BG57, BG18
Clothing: YR20, YR23, YR24
Wings: YR20, YR23, R11, R12, R20, BG 10, BG11, BG23


I didn't over embellish as the papers were bright and busy, just a few flowers and some MME brads in the corners. I finished off with a bow from a scrap of ribbon from my scraps box and popped a little Prima bling on the top. The sentiment is from Whimsy and is cut with a matching die. Lastly I added a flurry of tiny butterflies cut with a Memory Box die.


I decorated the inside as usual with papers to complement the front.

Well that's all from me today, don't forget to sign up for my blog candy here if you haven't already, there's just over 2 weeks now till I draw a winner, and I'll see you all next time.

Enjoy your day! : ) x x 


Tuesday, 25 March 2014

Breeze at Dies to Die for

Happy Tuesday everyone!  For me it really is a happy Tuesday and for once my post is not scheduled because I'm off work until Thursday, yay!  So lots of crafting time for me !

Today I'd like to share a card I made for my DT inspiration over at Dies to Die for.

I used the delectable 'Breeze' a Saturated Canary stamp in rubber, produced by Little Darlings Rubber Stamps.  Isn't she just gorgeous?  I coloured her with my Copics this time but I'm itching to colour her in distress inks too, she's so lovely to colour.
Skin : E11, E00, E000, E000, R20, R11
Hair: E50, E51, E31, E35, E37
Dress: BG70. BG72, BG75, E41. E42, E43


The papers are by Inkido, I love them so much I had a hard time cutting them and then when I went to link them I discovered they were out of stock, horror! There are others in the range that are very similar though and just as pretty. I distressed and inked all the edges with Walnut Stain distress ink and sewed them with Gutterman Top Stitch thread.


I used some beautiful Prima flowers, some gorgeous pleated organza ribbon, some gold lace which is just too lovely and I managed not to cover completely, some Prima bling and a beautiful brad to hold my seam binding bow in place.  As always links to items in the shop are at the end of this post.


I added some tiny Memory Box butterflies and some Liquid Pearls to finish off my image, and my sentiment.
The sentiment is from a whimsy stamp set and has been cut with a Marianne Design set of dies that I also used the cut the circle framing the image and the aperture for the inside of the card below.


Well that's all from me today, I'll be back tomorrow with a post for Kraftin' Kimmie's Wonderful Wednesday challenge.  Until then, have fun crafting! : ) x x