My Lovely Followers

Showing posts with label MFT. Show all posts

Saturday, 17 February 2018

MFT You Are the Sweetest

So I'm trying to share more of my makes here on my blog. I share on Instagram a lot these days and don't always get the time to share here too, so I'm trying to be better. Hopefully over the next month I will get a chance to share some of the cards I've already shared to IG but didn't get to share here.

This is a card using several techniques. Stamping and embossing, watercolouring with Zig markers and also stacked camouflage die-cutting. I've listed the products I used at the end of my post. No links but you can type them into Google and see who stocks what. 


MFT Funky Flowers Clear Stamp Set
Strathmore Bristol Smooth Paper
MFT Orange Fizz Card Stock
Versamark Ink
Altenew Crisp White Embossing Powder
Zig Clean Color Real Brush Markers
Sparkling Clear Sequins

Thanks for visiting!

Monday, 27 November 2017

Whimsy - Winter Cheer

Hello!

I'm sharing a couple of bright and simple Christmas cards today made with the Snow Flurry Stamp Set and matching dies. 
To make this card I first cut a panel of Bristol Smooth paper and did a little ink blending with Distress Oxide ink in Picked Raspberry, sprinkling some drops of water and blotting. 

The snowflake was made by stamping with versamark ink on some Limelight Card Stock and heat embossing with white embossing powder and then cutting out with the matching die. 
I stamped a sentiment from the Abstract Christmas stamp set on Limelight Card Stock and heat embossed that also, then cut out with a banner die.

I made an A2 card base from Razzle Berry Card stock, and adhered my panel, then popped up my snowflake and sentiment on the top with some foam tape. I finished with a few jewels from Little Things by Lucy's Cards 


For my second card I did exactly the same as for the first card, just changing the colour of ink and cardstock and making a horizontal card rather than a vertical one.

These cards were so quick and simple to make you could always make a batch of them to cover your Christmas needs and even keep them individual just by changing up the colours/orientation like I did with these two.

List of Products

MFT Stitched Rectangle STAX Die-namics
Strathmore Bristol Smooth Watercolour Paper
Distress Oxide Inks - Picked Raspberry and Twisted Citron
MFT Cardstock - Picked Raspberry, Limelight, Pure Plum
Versamark Ink
Altenew Crisp White Embossing Powder
MFT Stitched Sentiment Strips Die-namics


Happy crafting!


Friday, 24 November 2017

MFT Stamps - Ski-sons Greetings

Hello!

I can't believe that it's less than 5 weeks until Christmas! Where on earth did that time go.

For once this year I am well ahead of the game when it comes to Christmas cards and I have been loving stamp sets that can be used beyond Christmas.
Ski-sons Greetings from MFT Stamps is just such a set as it has some fun seasonal images that are suitable for many winter cards and has a mix of fun sentiments that can cover Christmas, Birthdays and more.

I stamped my images onto some Bristol Smooth paper and coloured them with my Zig Markers and a water colour brush


The background was created using Distress Oxide inks and stencils. I didn't manage to nab the Drifts and Hills Stencil from MFT when it released, so I made one of my own, drawing freehand on some stencil material and then cutting out with scissors.

I cut the background with the new Mod Rectangle die-namics, mounting it on my card base and heat embossed a sentiment from the set with white embossing powder on Limelight card stock and cut out a frame using the Rectangle Word Window Frames die-namics.

I cut out my images with the matching die-namics and popped the bear onto a mini action wobble, popping the hat up with a little foam tape off to the side so that it looks like it's flown off of his head with the movement of the jump.

I finished the card by adding a few small snowflakes cut from glitter paper and some Nuvo Drops. The 30 in the top left corner was cut using a memory box die I've had for ages.

I used the following to make my card:

MFT Summer Splash Card Stock
MFT Limelight Card Stock
MFT Ski-sons Greetings Stamp Set
MFT Ski-sons Greetings Die-namics
Versafine Ink - Onyx Black
MISTI Stamping Tool
Strathmore Bristol Smooth Paper
Zig Clean Color Markers
MFT Mini Cloud Edges Stencil
Distress Oxide Inks - Salty Oceam and Spiced Marmalade
MFT Stitched Mod Rectangle STAX Die-namics
Versamark Ink
Altenew Crisp White Embossing Powder
Heat Tool
MFT Rectangle Word Window Frame Die-namics
MFT Layered Snowflake Die-namics
Glitter Card Stock
Nuvo Drops - Morning Dew
Memory Box Classic Number Die

Hope you enjoyed my card today and thank you so much for visiting!


Wednesday, 8 November 2017

MFT Woofing you a Happy Birthday

Hello!

I have a fun little card to share with you today.

Using an older MFT Stamp Set, Birdie Brown's Lucky Dog, I first randomly stamped my little dog all over a piece of Strathmore Bristol Smooth paper with Black Versafine Ink, also stamping some paw prints from the same set.

I coloured these in with my Zig Markers and trimmed my panel with a large rectangle die and adhered it to a card base made with some Limelight card stock.
I coloured up an extra dog and cut that out with the matching Die-namics.


I stamped a sentiment from the set in black ink on a scrap of Limelight card stock cut out with a banner die from Blueprints 20.
I cut a panel of heavyweight vellum and adhered that, centering it over my base, and hiding the glue b
behind the elements. I added my banner and my little dog with some foam tape, and finished with a few enamel dots.

I hope you like it, this one was lots of fun to make.


Monday, 30 October 2017

Christmas Mail


Hello!

A while back I made a card using some dies from MFT and whilst I shared it on Facebook I totally forgot to share this creation on my Blog and on Instagram. So I'm rectifying that today.


I used some cute Christmas papers by Lemoncraft, the Mail Delivery Die-namics, the Mini Mail Die-namics, and the keyhole from the Lock and Key Die-namics all from MFT Stamps to make this card. Other dies are also from MFT Stamps but are no longer available.

Thanks for visiting! 


Monday, 23 October 2017

CASE a card Monday - Polar Bear Pals

Hello!

It's been a while since I did a CASE a card Monday, so I thought I would pop one in today.

This shaker card was inspired by a card made by Debbie Olsen, you can find her blog here.

I used the Polar Pals stamp set again, which I fussy cut, not having the dies, theMFT Pierced Rectangle Frames, (which are no longer available I believe, although you can get stitched ones that are almost identical), and a couple of dies from Blueprints 15 and 20.

My skating bear is coloured with Zig Markers to coordinate with this lovely MFT paper.


The background for the shaker window is made using the MFT Cloud Stencil and Salty Ocean distress ink and the shaker selection is from Little Things by Lucy's Cards.

This is the card by Debbie that I cased. Unfortunately I couldn't find a direct link to the card on Debbie's blog, but I have linked to her blog above.

Handmade card from Debbie Olson featuring Birdie Brown Cool Day

That's all from now, but I'll be along later with some more Whimsy Inspiration for you.

See you later!


Thursday, 19 October 2017

Beary Good Birthday

Hello! I'm trying my hardest to go through my draft folder and share some of my MFT cards there, before sharing some of the newer ones made with my latest haul....it's hard....oooh look shiny! lol!

But as Blue Peter (UK peeps should understand this one) would say, here's one I made earlier.


I combined the Polar Bear Pals set (I don't have the matching dies so I fussy cut them out), with the Concentric Circle Grid Stencil (I used Peacock Feathers, Cracked Pistashio and Shaded Lilac Distress Inks and my Clarity Stencil Brushes), the largest rectangle from Blueprints 15 and the smaller rounded rectangle die from Blueprints 31, to make a winter birthday card.

I thought this stencil kind of gave the feel of an igloo.

The bears are coloured with Zig Markers and a watercolour brush on Strathmore Bristol Smooth and I popped them up with some foam tape. I glued the whole thing to a lilac card base.

I finished my card with a few sequins for a little interest.

Thank you so much for taking the time to visit.


Wednesday, 20 September 2017

MFT Super Star Card Contest


Hello!

Life has been super busy and of course like all things, the stuff that you really want to do always occurs when you have virtually no time to do it.
So I was not surprised when the MFT 2017 Card Design Superstar contest cropped up right when I barely had time to draw a breath. With only 2 weeks to go before I jet to Orlando to teach at this year's Whimsy Stamps Craft Retreat, I'm in the middle of preparing all my kits and instructions, plus organising all the usual holiday stuff like travel insurance, currency etc. plus getting all my cards made and photographed for the October release countdown  which will happen right at the time I'm preparing to leave and whilst I'm over there. In addition I'm super busy at work and up to my ears in this years Health and Safety audit.

So whilst I have managed to scrape 2 cards together (by the skin of my teeth and very close to the wire, I don't consider them my best work. A shame indeed but time was against me and it is what it is.

So what did I get time for?

First off is my entry for the Clean and Simple Genius Category


I kept things simple...no surprise there being what the category is, concentrating on one off set image , coloured with zig watercolour markers and using some stenciling with distress inks to highlight it on my card. A simple sentiment stamped in black ink on the other side and a few snowy white gems radiating to give the impression of snow. I mounted my white layer on a lilac one for a little extra contrast.

I used the following MFT products.
Toasty Greetings Stamp Set (no longer availalbe)
Toasty Greetings Die-namics (no longer available)

Next is my entry for the Coloring Virtuoso Category


I love the cute animals from the Jungle Gym set and wanted to put them in front of a sunset. 
I made the sunset by blending Distress Inks in Seedless Preserves, Worn Lipstick, Abandoned Coral and Carved Pumpkin on some Strathmore Bristol Smooth paper.
I watercoloured my images with my Zig Markers, brush and water using the following colours:
Light Brown, Oatmeal, Dark Oatmeal, Dark Gray, Pale Pink, Light Violet, Purple, Bright Yellow, Orange, Gray Brown, Mid Green, Olive Green, Dark Brown, Deep Brown, stamping them on Strathmore Bristol Smooth also.
After adding my frame to my background and base card and arranging my imaged on foam tape, there wasn't too much room for a sentiment, so I went for a simple one from the Lovable Leopards Set embossed in white and cutting the banner down to size.

I used the following MFT products on my card:

(no longer available, so I linked the stitched version which is almost identical)


I didn't sadly get enough time to make anything for the Inovation Master Category, oh well there's always next year!

Thanks for visiting!

Thursday, 14 September 2017

Altenew - Happy Retirement

Hello!

Recently a lovely lady in my department retired and I was asked to make a card for her.  I made it quite large as the whole department needed to sign it, so I made it 5 x 7 and added an insert so there was more space to write.

I used the Peony Bouquet stamp set from Altenew, stamping with Versamark ink and embossing with Altenew Crisp Pure White embossing powder. 


I coloured the flowers and leaves with my Zig Markers, using Yellow, Bright Yellow and Orange for the flowers and Light Green for the leaves.
I made an ink blended panel using Fossilized Amber and Abandoned Coral Distress Oxides and glued that to the centre of my card base, gluing a panel of vellum over the top to give a soft appearance.
I cut one MFT Snow Drifts Cover Up Die-namics in smooth white cardstock gluing it to the back of a white cardstock frame cut with MFT Pierced Frames Die-namics. 
I used my Gansai Tambi Starry Colors watercolours to splatter some small gold dots over this and then glued it on the front of my card, covering the edges of the vellum and blended panel.
I cut another piece of white cardstock with MFT Double Stitched Rectangles STAX and stamped a retirement sentiment in Versamark ink, from Whimsy Stamps Happy Sayings stamp set and embossed this with Altenew Crisp Embossing Power in Antique Gold.


I blended a scrap of watercolour paper with distress inks in yellows and oranges and then cut out the word HAPPY with MFT Happy Greetings Die-namics layering it up with another 2 cut from white cardstock and adhering it abover my stamped sentiment. I them glued the rectangle to the centre of my card.

I fussy cut all my flowers and leaves and arranged them around my card, adhering them with foam tape for some dimension.
To finish I added some gold enamel dots I made with Pale Gold Nuvo Drops, and some Crystal Clear sequins.

I hope you enjoyed my project today, I really enjoyed making it.

Thanks for dropping by!

Sunday, 10 September 2017

MFT - Wild About You


Hello!

It seems ages since I shared a card made with MFT Stamps doesn't it? August and the beginning of September have been so busy, between work, my daughter and her partner coming to stay for a few days, being ill and preparing for the Whimsy September release and the Whimsy retreat (less than 4 weeks away now eeeek!) it seems like I haven't had a spare moment for anything.

Strangely enough I have plenty of MFT cards in my draft folder, I just haven't had the time to blog any. So I'm rectifying that today with a card made using the MFT Wild About You stamp set.


This was from last month's release and I loved the fun and quirky look of this one, I decided to use the stripes on each of the animals (I didn't use the Zebra from the set on this card), to give them a rainbow treatment and paired it with a sheet from the Party Patterns paper pack which went perfectly.

I used my zig makers to colour them in 

Colours used: Yellow, Bright Yellow, Yellow GrenViolet, Orange, Light Green, Pink, Light Blue, Blue, Light Gray.

added a few details with a white gel pen and a black glaze pen,and cut them out with the matching die-namics. I cut a frame with the MFT Pierced Rectangle Frames Die-namics to frame the lion and giraffe and popped everything up with some foam tape. 

The sentiment which is from the same set, I thought was perfect for these rather different looking animals and I split the sentiment in 2 to fit the design of my card.

I finished the card with a sprinkling of matching enamel dots.

Thanks so much for dropping by!


Sunday, 3 September 2017

Ribbon Girl Card Challenge - September


Hello!
We're back from our summer break over at The Ribbon Girl blog  with the fist challenge for September.
As it's the first Sunday in September it's a card challenge, so you can use anything you wish, it just has to be a card.

My nephew requested a card for his girlfriend similar to another card I made recently but in purples and with a love based sentiment. This is what I made for him.


Apart from the stamps, ink and white cardstock, all products used on this card were from 
The Ribbon Girl and I've added the links below:

Ribbon Girl Products Used


I do hope you can join in with our challenge, there are prizes for 3 lucky winners:

First prize:  Papers from Maja Design, Sweden - the prize will be sent directly to the winner


Second prize:  £10 voucher towards a shopping spree at The Ribbon Girl


Third Prize:  A stamp of the winner's choice from LOTV


Thanks for dropping by!


Tuesday, 15 August 2017

Funky Flowers - Navy & Gold

Hello!

 I'm sharing 2 cards today, and as a bit of a change from rainbow colours and cute images, I thought I'd share something classy and subtle.

I made these cards in Navy, White & Gold a while back, because I wanted to play with my Gansai Tambi Starry Colours paint palette and I thought this deep blue cardstock would be the perfect way to show it off.

The cards are really quite simple and easy to make.
For my first card I made a top folding vertical A2 (US) card base in Nightshift Blue cardstock.

I used a stitched rectangle die from Blueprints 20 to cut a rectangle in smooth white cardstock, and the Pierced Rectangle Frames to cut a medium frame from the Nightshift Blue cardstock.
I stamped some flowers from the Funky Flowers stamp set in Versamark in on the nightshift blue cardstock and then heat embossed with white embossing powder.
I painted my flowers with my Starry Colours paints and once dry, cut them out with the matching dies.

I stamped a sentiment from the Essential Sentiments set, with versamark ink on the Nightshift Blue cardstock and heat embossed with fine gold embossing powder. I cut a frame from smooth white cardstock using the Rectangle Word Window Frames and trimmed my sentiment to fit behind it.

I adhered the white panel directly to my card base and then the blue frame on top using some foam tape.

I arranged and adhered my flowers with glue and foam tape and also my sentiment.

To finish I added a few gold and clear sequins.


For my second card I made a shaker card using the same frame die with a couple of the extra flowers and stamped and embossed a sentiment from the You Give me Butterflies sentiment set onto a banner from the Blueprints 20 die-namics.


I used the following items for my cards:

MFT Nightshift Blue Cardtock
Smooth White Cardstock
MFT Funky Flowers Stamp Set
MFT Funky Flowers die-namics
MFT Blueprints 20 Die-namics
MFT Pierced Frames Die-namics
MFT Essential Sentiments set
MFT You Give me Butterflies Sentiment set
Altenew Crisp Embossing Powder - Antique Gold
Foam Tape
Acetate
Tape Runner
Ranger Multi Medium Matte
Big Shot Machine

That's all for today, thanks for visiting!


Sunday, 6 August 2017

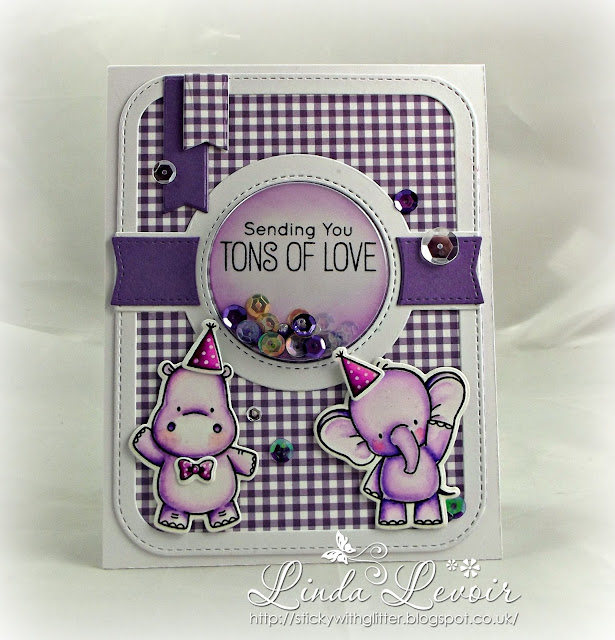
MFT Happy Hippos meet Adorable Elephants Shaker card

Hello!

My goodness it seems ages since I last posted here. Work was incredibly busy last week and I had quite a bit to sort out at home as well,m plus I got caught up in a new author and have had a bit of a marathon read of her works lol!

Anyway I'm here today with something new and will try my best to share something new each day for you. 

This is my second card using Handy Hippos and I decided that these hippos were just the perfect match for the Adorable Elephants set, (especially as the sentiment I used worked so well for both), so I've put them together here in a sweet little purple shaker card. I've listed all the MFT products for you at the end of the post, and the Zig Marker colours are listed below:

Lilac, Violet, Light Pink, Light Violet and Purple.
I added the little white spots with a white gel pen.


MFT Products used

Blueprints 31
Happy Hippos Stamp Set
Happy Hippos Die-namics
Adorable Elephants Stamp Set
Adorable Elephants Die-namics
Tiny Check Brights Paper Pad
Circle Shaker Pouches
I also used the banner die from Blueprints 20

That's it for today but I hope to be back again tomorrow.

I'm stating to list lots of my new CAS style cards on my Etsy Store, it's a long job so it might take me a while to get them all on there lol.

Thanks for visiting.


Monday, 31 July 2017

MFT Stamps - Leopard Grid

Hello!

I'm popping in today with a sweet little make using the MFT Stamps Loveable Leopards stamp set.

This card was actually the first card I used making this set and it's been sitting in my draft folder for a while. I coloured this with my Zig markers, the colour combo I used for this leopard is a bit different from the others I made and I must admit I prefer the others which are a bit more golden yellow toned.


I used the leaves from the Funky Flowers stamp set in this card also as well as some paper from the Graphic Grid paper pad, Blueprints 31 and a Stitched Sentiment Strip. The window is made using the MFT Square Peek-a-boo  Window die.
The addition of a few orange enamel dots finished my card perfectly.

Items used:
Smooth White Cardstock
MFT Blueprints 31
Zig Clean Color Real Brush Markers
MFT Loveable Leopards Stamp Set
MFT Loveable Leopards Die-namics
MFT Funky Flowers Stamp Set
MFT Funky Flowers Die-namics
MFT Stitched Sentiment Strips
MFT Square Peek-a-boo Window Die-namic

Affiliate links are used on some products. This means that if you make a purchase after clicking on my link, I receive a small commission with no extra cost to you. I truly appreciate your support when using these links

That's all for today, thanks for visiting! 


Sunday, 30 July 2017

Altenew &My Favorite things- Celebrate

Hello!

Dashing in with a quick share for you.

I used a combination of dies from My Favorite Things, and an outline flower stamp and Gold embossing powder from Altenew to make a simple but elegant card that could be used for a birthday, wedding, engagement or anniversay...or any special day realy.


I used some MFT Cardstock in Crushed Coral to make my card base and then used the large die from Blueprints 20 to cut some vellum. I really love using layers of vellum when you want a softer effect and of course it's not as heavy as cardstock.

I took the large outline flower stamp from Altenew's Garden treasures, and stamped all over my watercolour paper with Versmark ink. I did this a few at a time, using my anti-static powder first and using the crisp embossing powder from Altenew in Antique Gold to heat emboss/
I then used my distress inks in Worn Lipstick, Abandoned Coral and Dried Marigold  to blend on some colour. I added a few drops of water and left for a few seconds before blotting with some absorbent paper., then I added a light misting of gold Glimmer Mist and left to dry. 

I cut the Celebrate word out several times in cardstock to match my base card, and for the top layer I sponged over with Versamark ink before adding more of the gold embossing powder and heating to make the beautiful gold finish. I then glued all my layers together to make my dimensional word.

I used a sentiment from the Simon Says Stamp You Matter stamp set, and embossed with more gold powder on some vellum, cutting it out with an MFT Stitched Sentiment Strip die.

I glued all my elements together, popping the main panel up on some craft foam and then added a few sequins from Little Things by Lucy.

That's my card for today, I hope you like it and thanks for visiting!


Tuesday, 25 July 2017

My Favorite Things - Favorite Person

Hello!

I'm back with another MFT make today, and this time I'm using the super cute Jungle Gym set and matching die-namics again.

I coloured the cute images with my Zig Markers, I cannot find the list of all the colours I used but I know that I used the following:

Tiger - Light Brown, Dark Gray, Gray
Monkey: Oatmeal, Dark Oatmeal, Light Pink
Birds - Pink, Deep Pink, Cobalt Bue, Persian Blue, Pale Green, Emerald Green, Bright Yellow.


I used the Mini Cloud Stencil and Picked Raspberry, Dried Marigold, Wild Honey, Cracked Pistachio, Peacock Feathers and Blueprint Sketch distress ink to make the background for my card and frame it with the Pierced Rectangle Frame STAX and some Calm & Cozy  Chevron paper.

Hope you like it!.

Thanks so much for dropping by.


Saturday, 22 July 2017

MFT Stamps Sketch Challenge #342

Hello!

It's been a long time since I joined in with the sketch challenge over at MFT Card Challenges, so I thought I'd dash off a quick card using the new MFT Stamps Happy Hippos clear stamp set.

I used the hippo with the present and the 3 little birds, stamping them on some Bristol Smooth paper  and colouring them with my Zig Clean Color markers, using Turquoise Green, Yellow Green, Light Green and Bright Yellow. I cut them out with the matching dies and set them aside.

I made an A2 vertical top folding card base and used a little Sno Cone Ink and the Mini Cloud Edges stencil to sponge a few clouds directly onto my card base. I cut some Limelight and Gumball cardstock with one of the Grassy Edges die and finished the edges with a stitched rectangle die, stamping a sentiment from the same set onto the top layer before gluing them both to my card base.

I cut some while and patterned paper with one of the Basic Scalloped Edges dies and finished with the same stitched rectangle die, gluing both to the top of my card. Then I added the hippo and birds with some foam tape and finished with a few enamel dots. You could omit the dots as it doesn't really need them, I just felt they helped balance the card.

If you want to join in with this week's challenge you can find it here, but you only have till Tuesday evening.

Thanks for visiting!

Altenew & Simon Says Stamp - Leaf Background Card

Hello!

I have a few cards to share with you today but as they are all different I've split them into different posts. I'm really trying to work my way through my draft folder and clear some of the backlog this weekend, or some cards will never see the light of day here.

So the next few posts may be short on text.

This card is made using the leaf die from Altenew's Graden Treasures set and a the You die and You Matter stamp set from Simon Says Stamp.

I used Distress Oxide inks in Peacock Feathers, Cracked Pistachio and Twisted Citron for blending and stamping.
I also used Blueprints 31 from My Favorite Things, Altenew Gold embossing powder, Gansai Tambai Starry Colours watercolour paint and a few gold and mint sequins from Little Things by Lucy.

I highlighted the leaves with a Sakura Gold Star Gelly Roll pen.

Thanks for dropping by!


Tuesday, 18 July 2017

MFT Stamps - Celebrate, Rainbow Blending, Stamping with Water

Hello!

I have a couple of cards to share with you today, I love making cards where you get a kind of a Two for the Price of One thing going on.

First of all I have to explain that I made the background without any idea of how I was going to use it in a card. I was just trying out some techniques I'd seen in this video from Jen McGuire where she shows stamping with water. I thought it was a cool idea and decided to give it a try.

Since I'm all about the Rainbow lately I chose rainbow colours swapping the red for a bright pink. The ink blending is all done with Distress Oxide inks which gives it that lovely soft brushed sort of finish.

I used Picked Raspberry, Fossilized Amber, Twisted Citron, Broken China and Wilted Violet, blending them to create the additional shades.
Once I was happy with my blending I spritzed a background stamp, (this is the Wavy Colouring Book BG Stamp from MFT), with some water and stamped onto my blended cardstock. Then I blotted and dried with my heat gun.

I loved the way the pattern came out but for a few days I had no idea what I was going to make with it, and then I got the Celebrate die from MFT Stamps. Bingo!

After dabbling with the idea of using the whole panel, I decided to go for a 2 for 1 creation, making 2 cards from the 1 background. I used a Stitched Scalloped Basic Edges die to cut the sedge of my first card and then used the same card on the white cardstock for the 2nd.
I cut the outside edges with a large stitched rectangle die from  Blueprints 15.

Basically the 2 cards are almost the same, just reversed, except the first card I inlaid the die cut word and heat embossed a sentiment in white on a banner cut from Limelight cardstock, and on the 2nd I stacked lots of layers of the die-cut word to make it very dimensional and stamped the sentiment in black ink directly onto the white cardstock.

To finish both cards I added a few sparkling clear sequins.


Here you can compare the 2 cards. 

I can't decide which one I like the most, which do you prefer?

Thanks so much for visiting, don't forget to drop by tomorrow for the new release from Whimsy Stamps!


Saturday, 15 July 2017

MFT Stamps - Jungle Gym


Hello!

I hope you are all having a great weekend so far. It's bright and warm here but a little overcast.

My order of goodies from the July release for My Favorite Things came yesterday, and since the other half was out for the evening, I couldn't resist having a bit of a play right away.

I made a few cards last night and this morning, and today I'm sharing a little card I made with the Jungle Gym stamp set and matching Die-namics.

This is such a sweet set with some great sentiments as well.

Firstly I stamped the images I wanted to use on some Strathmore Bristol Smooth paper and coloured them with my Zig Markers. Now don't faint people but I have the colours for you today!

Tiger: Light Brown, Gray and Dark Gray
Monkey: Oatmeal and Dark Oatmeal
Bird: Light Blue, Cobalt Blue and Persian Blue
Leaves: Green and Deep Green

I cut these out with the matching dies and set them aside while I worked on my card base.

I took another piece of Bristol Smooth paper and used both the original MFT Stamps Cloud Stencil, plus the new Mini Cloud Stencil along with Peacock Feathers and Broken China Distress Oxide ink and a blending tool, to create a sky. I cut this out with the large rectangle die from Blueprints 20 and also cut out a window with the Square Peek a boo window die, making sure to keep the square that was cut out.

I used the Grassy Edges die-namics to cut 2 layers of grass, one from Limelight Cardstock and one from Gumdrop Cardstock, I ran the limelight 'grass' through my Big Shot with the same rectangle die so that it matched the rest of my base then adhered both strips to the bottom edged.

I laid out the rectangle on my card base and adhered the cut out square to my card base through the whole, then I popped the rectangle up on some foam tape, after attaching the swing to the back.

I added my figures with some thin foam tape. To finish I stamped a sentiment from the set onto a scrap of limelight cardstock, cutting it out with a banner from the Stitched Sentiment Strips and trimmed it to fit, attaching it to the top of my window with a little more foam tape.

I hope you like my card and I'll have some more from the new release to share with you soon.

Thanks for visiting!