My Lovely Followers

Sunday, 16 September 2018

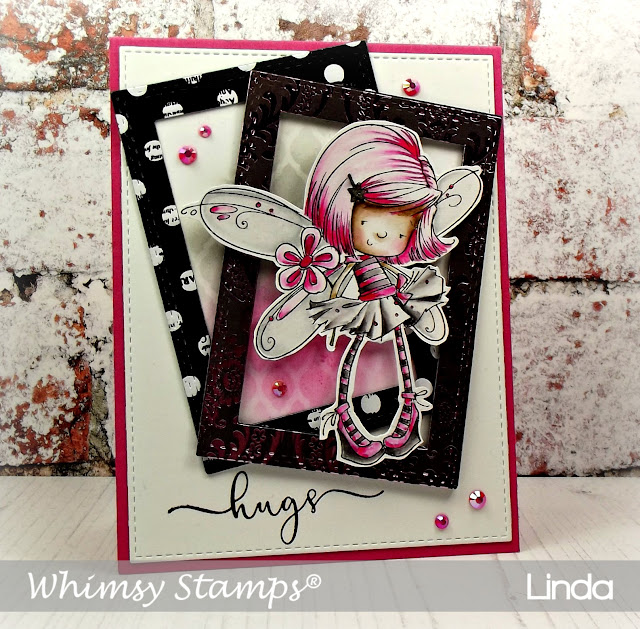
Whimsy Stamps - Flower Fairy


Hello!
It's hard to believe that we're already almost halfway through September and racing towards the end of the year. Have you started making your Christmas cards yet? I really need to get started on mine and to help there are tons of wonderful Christmas stamps and stamp sets available from Whimsy Stamps, including some gorgeous Christmas fairies just released this month.

Today I have a non Christmas fairy to share with you, this is an older stamp but I've been itching to use her for a while, she looks so sassy and modern!


I've coloured her with my Zig Markers, those of you who know me will know that these are now easily my 'go to' markers of choice though I have previously used Copics and Distress Ink Markers (which I still sometimes use).

I made a reasonably simple card, not at all difficult to construct, but quite striking with the use of some eye-catching papers to match your colouring.

After colouring her I fussy cut her out and popped her up on some foam tape, showcased by 2 frames cut using the Shaker Maker Rectangle die set. The background behind the frames is created using the Formal Lattice Stencil and some inks to match the colours on the fairy.
The sentiment is from the Fly By clear stamp set.

I've listed all the products used below with links to the items in the store, just click on the pictures!


Flower Fairy Rubber Cling Stamp Shaker Maker Rectangle Die Set Fly By Clear Stamps Formal Lattice StencilVersafine Full-Size Ink Pad - Onyx Black 

I hope you enjoyed my card today!

Sunday, 2 September 2018

Whimsy Stamps September Release Day 2

Hello!


Life is BUSY atm, getting ready to fly out to Rome on Tuesday and I'm working tomorrow so got to get everything ready today, but before I get back to it I'd like to share another card with products from the September release.

It's never too early to start on Christmas cards right? I'm probably a bit late starting mine, but I thought I'd make something a little different.
I used the new Peekaboo Window 1 Die and combined it with an older Background Stamp Snow Flurry, embossing it with white embossing powder on watercolour paper and then doing a subtle ombre blending with blue inks to complement the beautiful blue butterflies I used from Kay's Kreative Korner.

I used some silver glitter cardstock to mount the butterflies so they stood out against the background, and finished the card with some clear gems.

I didn't want to cover my card with a sentiment, so I put that on the inside.


*NEW Peekaboo Window 1 Die Snow Flurry Background Rubber Cling Stamp VersaMark Full-Size Ink Pad - Original (Clear) White Embossing Powder - Super Fine Detail


That's all folks, I'm off to finish sorting my packing ready for tomorrow.

Thanks for visiting!


Saturday, 1 September 2018

Whimsy Stamps September Release - Day 1

Hello!

It's time for the new September release from Whimsy Stamps, where has the year gone?!

My card today uses both the new Web Background rubber stamp and the Halloween Creatures Stencil. Sooooo fun to use. The sentiment is a combo of the Happy large word die and the Happy Sayings clear stamp set. I've listed items used along with links at the end of my post, just click on the pictures to go to products in the store.

First I stamped the background using my MISTI and some Wilted Violet Distress Oxide ink onto some light grey cardstock.

Once dry I used the stencil and some Black Soot distress ink to stencil on the spiders.

I cut my panel with one of the Nested Stitched rectangle dies and then matted onto black cardstock leaving a very narrow border.

I made a card base from the same light grey cardstock that I used for my background.
I cut some purple glitter cardstock a little smaller than my card base and glued that down then mounted my background onto it with some craft foam in between. Because it's really difficult to adhere stuff to glitter card and because I hate wasting pretty cardstock behind stuff, I cut the centre of the glitter card out with a smaller rectangle die before gluing it to my card base.

I cut several Happy die cuts using the same grey stock and cut the final one in the glitter cardstock and stacked and glued them together and set aside. I stamped and embossed the halloween sentiment in silver onto some black cardstock and trimmed it to fit. I then glued this and the stacked Happy die cut to my card.

Finally to finish I glued some purple gems onto my spiders for a little more bling!


*NEW Web Background Rubber Cling Stamp *NEW Halloween Creatures Stencil Happy Sayings Clear Stamps Happy Large Word Die

VersaMark Full-Size Ink Pad - Original (Clear) Silver Embossing Powder

Hope you enjoyed it and thanks for dropping by!