My Lovely Followers

Thursday 4 October 2018

Whimsy Stamps October Release - Evergreen Trees

Hello!

Today I have a really quick and easy idea for a Christmas card, using one of the dies from the new Evergreen Trees die set from Whimsy Stamps.

This is a perfect idea for batch making Christmas cards, and you can ring the changes to make your cards individual also by using different colour glitter paper for them and even mixing colours!

This is the card I made and below you can find a short how to and then pics and links for the stamps and dies used. 


To make this card you just need a white card base, I make my own but you could use a pre-made one just as easily. You will need a rectangular card base, size is not too important, it just needs to be big enough to fit your trees and sentiment on.

First cut out 3 trees from green (or a colour of your choosing), glitter cardstock.
Then cut 6 more of the same die-cut in white cardstock.

Glue together 2 white and 1 green tree with the green being the top layer.  Set aside to dry.

Work out where your trees will sit on your card to find the position for your sentiment and then stamp on your card base using an ink that matches your trees. I use my MISTI to make sure my sentiment lines up just right, but you can use any stamp positioner or a block and T square.

Glue your trees onto your card centrally above your stamped sentiment.

Finish off with a few clear sequins........voila! Easy peasy right?

These dies are so good for making Christmas cards and I'll be showing you some more over the coming weeks.

*NEW Evergreen Trees Die Set Abstract Christmas Clear Stamps VersaFine CLAIR Ink Pad - Verdant Sequin Bag - Shine

Thanks so much for dropping by!


Tuesday 2 October 2018

Whimsy Stamps October Release Day 2

Hello!

It's day 2 of Whimsy Stamps release for October and there are lots of fun new goodies to be had.

For my card today I'm showcasing the new Brushed Stripes Background Stamp.

This is such a versatile stamp, you'll see some other examples of how I used this stamp later in the month, but for today's card I did one of my favourite things.....rainbow colours.

I first stamped my image on some Strathmore Bristol smooth paper, using my MISTI and some Versamark Ink, priming the paper first with my anti static tool.

Then I did some heat embossing with some white embossing powder.

I used various Distress Oxide inks and a blending tool to colour in my stripes, masking the areas I didn't want to take that colour, with some post it tape.

I used the Shaker Maker Rectangle Die set to cut the background into 2 pieces and then used the Thanks word die (this die is no longer available in store, but you can find a lot of other word dies here) to cut out the word from the centre piece, keeping all the pieces aside.

I used the 2nd largest Stitched Nested Rectangles die to cut a layer from white card to fit between my 2 pieces and glued all 3 to my white card base .

I cut several more 'thanks' from white card stock and glued them together, gluing the striped thanks on the top.

I then inlaid the stacked word and adhered the small left over pieces in their places. 

I stamped the 'for everything' sentiment from the Happy Saying set (one of my 'go to' sentiment sets)  in black ink on some white card stock and cut it to size, gluing it in place below my die cut word.

Finally I finished off with a few enameled dots.

 And there you have it. Products can be found at the end of the post, just click on the pics to take you to the item in store.

*NEW Brushed Stripes Background Rubber Cling Stamp Happy Sayings Clear Stamps Hand Stitched Nested Rectangles *NEW Summer Breeze Enamel Dots

Thanks for visiting!


Sunday 16 September 2018

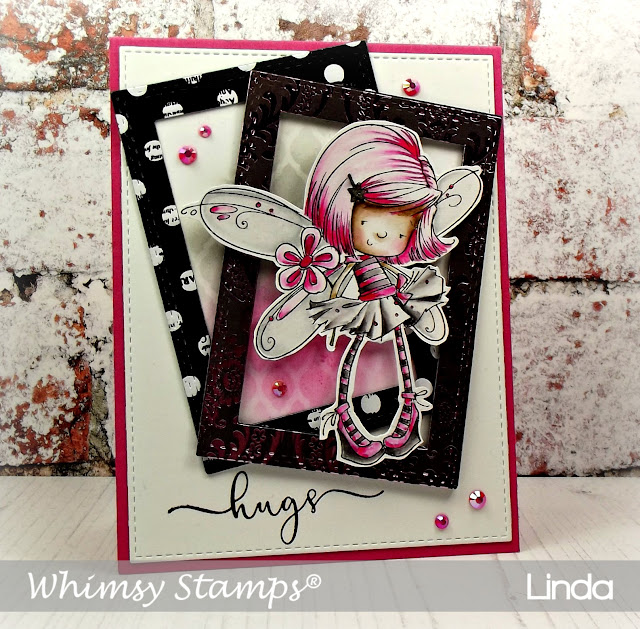
Whimsy Stamps - Flower Fairy


Hello!
It's hard to believe that we're already almost halfway through September and racing towards the end of the year. Have you started making your Christmas cards yet? I really need to get started on mine and to help there are tons of wonderful Christmas stamps and stamp sets available from Whimsy Stamps, including some gorgeous Christmas fairies just released this month.

Today I have a non Christmas fairy to share with you, this is an older stamp but I've been itching to use her for a while, she looks so sassy and modern!


I've coloured her with my Zig Markers, those of you who know me will know that these are now easily my 'go to' markers of choice though I have previously used Copics and Distress Ink Markers (which I still sometimes use).

I made a reasonably simple card, not at all difficult to construct, but quite striking with the use of some eye-catching papers to match your colouring.

After colouring her I fussy cut her out and popped her up on some foam tape, showcased by 2 frames cut using the Shaker Maker Rectangle die set. The background behind the frames is created using the Formal Lattice Stencil and some inks to match the colours on the fairy.
The sentiment is from the Fly By clear stamp set.

I've listed all the products used below with links to the items in the store, just click on the pictures!


Flower Fairy Rubber Cling Stamp Shaker Maker Rectangle Die Set Fly By Clear Stamps Formal Lattice StencilVersafine Full-Size Ink Pad - Onyx Black 

I hope you enjoyed my card today!