My Lovely Followers

Showing posts with label The Ribbon Girls DT. Show all posts

Sunday, 1 October 2017

The Ribbon Girl - October Card Challenge


Hello!

It's time for another Ribbon Girls card challenge today. Don't forget you can enter with any design as long as it takes the form of a card. You can find details of the prizes at the end of this post.

As you know I don't make a whole lot of fancy cards lately, my style seems to have permanently drifted over to CAS in the main, but when I do I like to play around making cards without stamped and coloured images.

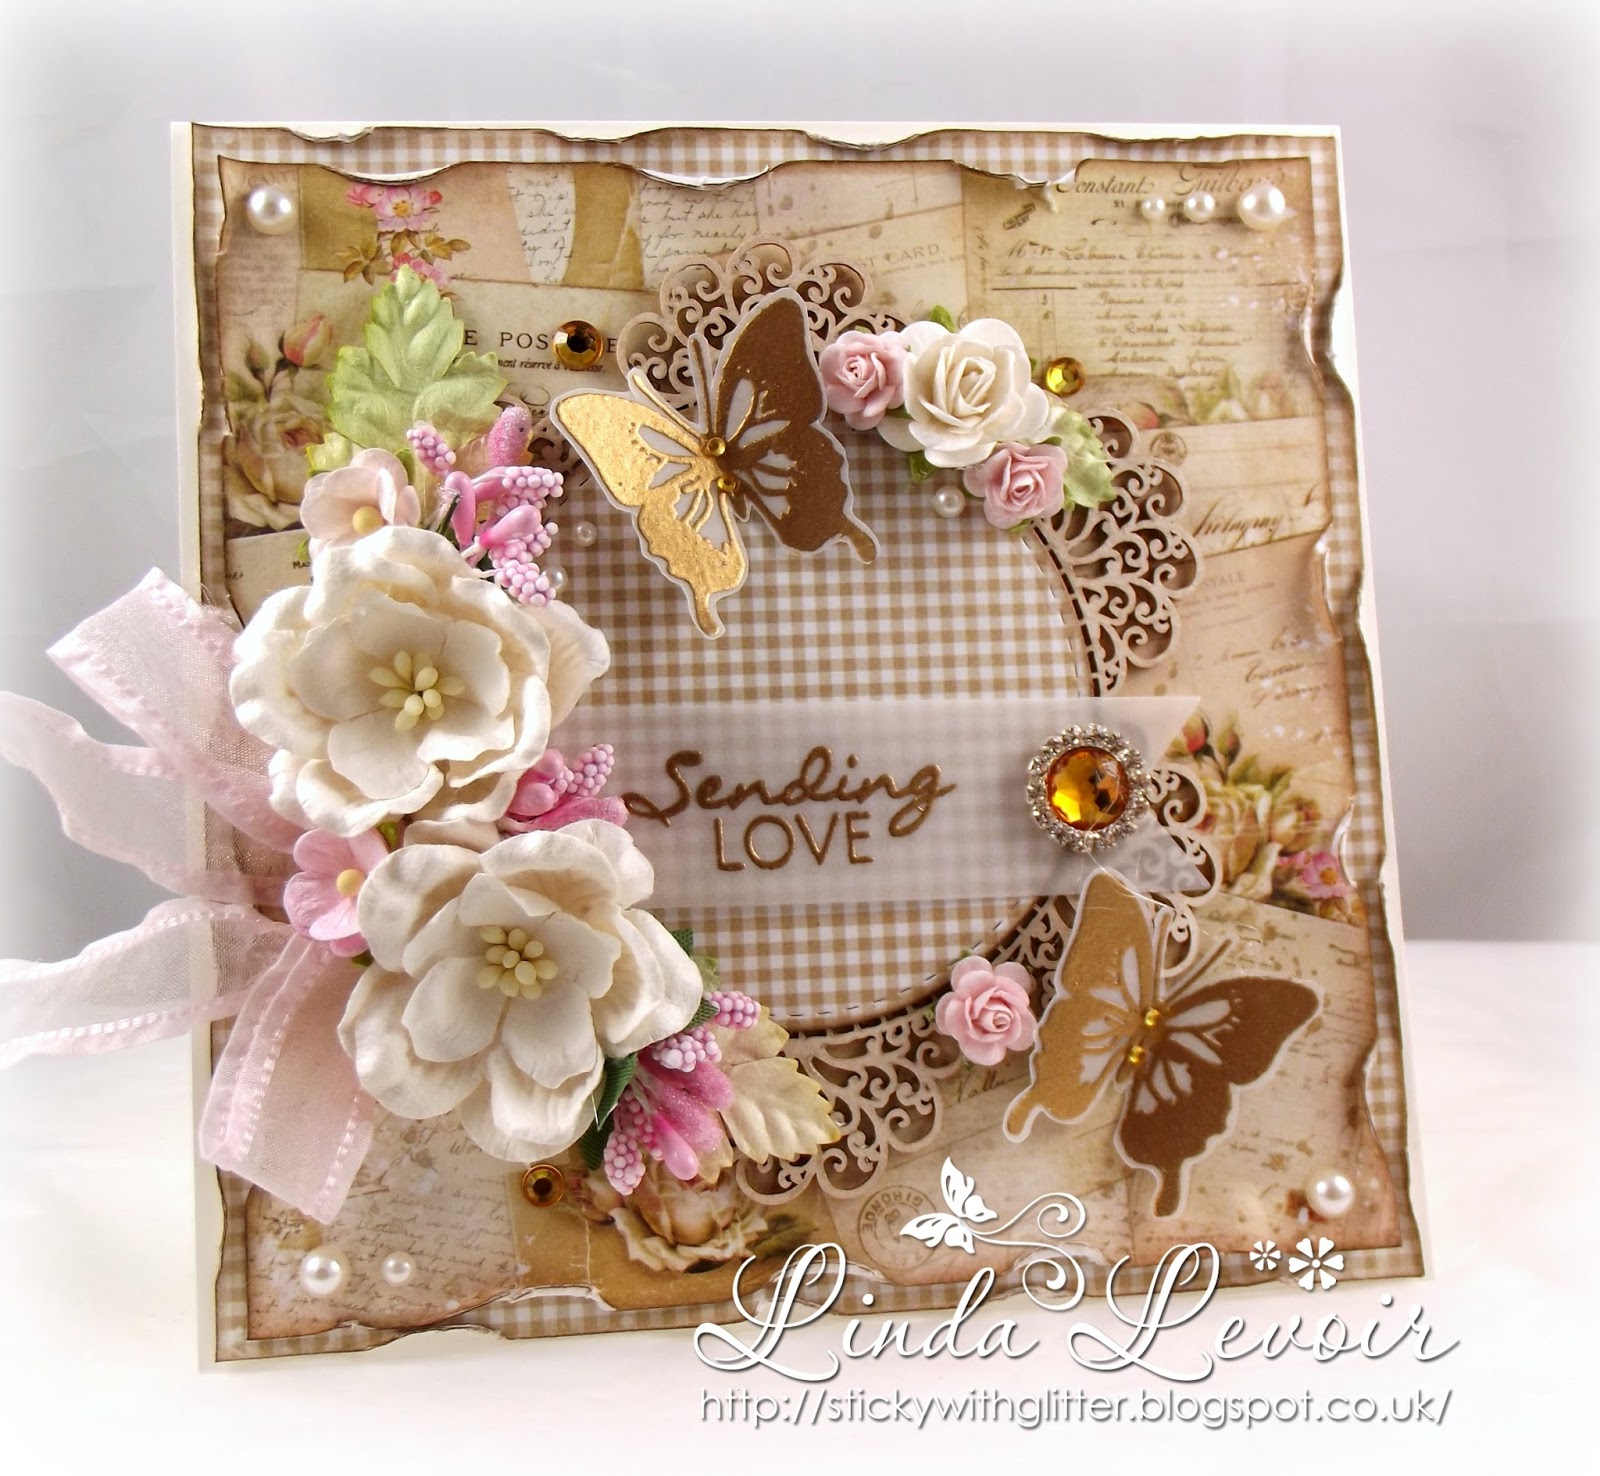
Today is no exception to that and I've used some beautiful papers, chipboard, flowers, beads and embellishments to create a pretty card that could be used for a wedding, engagement, anniversary or Valentine's day.

I distressed the edges of my papers with a blade, adhering and cut a frame from the pink paper using 2 circle dies. I glued my papers to my card base and popped the circle frame up with some foam tape.

I wanted my chipboard heart to stand out against my paper, so I sponged it with Distress Oxide ink in Worn Lipstick. These inks are great for colouring chipboard. I then sprayed it lightly with some Gold Glimmer Mist and left it to dry before gluing it inside my circle frame.

I made a triple bow with my pink ribbon and arranged that and a mixture of flowers, leaves, berries and sprays on my card, around my frame, gluing them all in place with my glue gun.

I finished with a mix of flat back pearls.


All items used (apart from Dies and Ink) are from The Ribbon Girl and are listed below with links to the items in the shop.

Lemoncraft Heart Painted 6 x 6 Pad
Monograce Chipboard Heart
12 mm Pale Pink Faux Silk Ribbon
Ivory White Magnolia Flower
Pink Wild Rose
20 mm Pale Pink Open Roses
10 mm Pale Pink Open Roses
Hip Rose Buds Pale Pink
Small White Blossoms
Pink/White Beaded Stamens
Ivory Pearl/Crystal Branch
5 mm Ivory S/A Pearls
3 mm Ivory S/A Pearls

I do hope you can join us. There are lovely prizes to be won
First prize:  Papers from Maja Design, Sweden - the prize will be sent directly to the winner

Second prize:  Your choice of 2 of the Christmas Mini Packs of 6x6 papers from The Ribbon Girl


Third Prize:  A stamp of the winner's choice from LOTV


Don't forget to check out the rest of the team's gorgeous creations!

Thanks for visiting!


Saturday, 23 September 2017

Ribbon Girl - 15 minute Christmas Cards

Hello!

When it comes to making Christmas cards it can be quite difficult creating batches of them that don't take you ages to make, but still are distinctly unique. Each of the 4 cards I'm showing today took 15 minutes or less to make and yet are completely individual.


To make my cards I used some simple rectangle dies, a Celebrate word die from MFT Stamps, some super cheap Christmas decorations I bought in a supermarket last year, some white and Kraft card for bases and the following items from The Ribbon Girl.


(This mini pack means you don't get tons more paper than you need, but more than enough to make a lot of cards, the designs are all gorgeous and at a bargain price!)

Sunday, 3 September 2017

Ribbon Girl Card Challenge - September


Hello!
We're back from our summer break over at The Ribbon Girl blog  with the fist challenge for September.
As it's the first Sunday in September it's a card challenge, so you can use anything you wish, it just has to be a card.

My nephew requested a card for his girlfriend similar to another card I made recently but in purples and with a love based sentiment. This is what I made for him.


Apart from the stamps, ink and white cardstock, all products used on this card were from 
The Ribbon Girl and I've added the links below:

Ribbon Girl Products Used


I do hope you can join in with our challenge, there are prizes for 3 lucky winners:

First prize:  Papers from Maja Design, Sweden - the prize will be sent directly to the winner


Second prize:  £10 voucher towards a shopping spree at The Ribbon Girl


Third Prize:  A stamp of the winner's choice from LOTV


Thanks for dropping by!


Sunday, 2 July 2017

Daydream at The Ribbon Girl

Hello!

It's time for a new challenge over at the Ribbon Girl Blog, and from this month onwards I will be moving from the Use Any Image Challenge Team to the Card Challenge Team.

So for this challenge you can use any style you wish, but it must be a card.

I fell in love with the new paper pad from Lemoncraft that Mary has in the shop, called Daydream, (I've listed in the links below), and I used this as the starting point and inspiration for my card. 

The colours are quite bright and very beautiful. 


I used one of the Chipboard Frames to make a focal point, this one is a double one and I decided to colour the top portion with Distress Oxide ink in Broken China to match in with the colours on my card. These inks are fab for colouring chipboard pieces as they don't sink into the chipboard and change colour like dye inks do, but sit on the top giving great coverage. I heat embossed my sentiment in gold on vellum, and added that to the centre of my card.

I gave the heat treatment to my organza ribbon with my heat gun, this is a great trick I picked up from Bev Rochester, and gives a lovely crinkled appearance to the ribbon, just make sure you keep your heat gun moving.

I've listed all the items used from The Ribbon Girl below:

Lucy's Enchanting Shaker Selection

I do hope you will join in with us, we have the lovely prizes below on offer:

First prize:  Papers from Maja Design, Sweden - the prize will be sent directly to the winner


Second prize:  £10 voucher towards a shopping spree at The Ribbon Girl
Third Prize:  A stamp of the winner's choice from LOTV


That's all from me for now, enjoy your Sunday!


Wednesday, 28 June 2017

Lots of Layers at Deep Ocean Challenge

Hello!

I'm having a little break from all the CAS today, with a layered, shabby card for 

For this card I used some lovely Lemoncraft Papers as a backdrop for this lovely Butterfly, made from the Beautiful Butterflies stamp set from MFT Stamps.

I did some ink blending on Strathmore Bristol Smooth Cardstock and then made some small splashes of water and blotted. Once fully dry I stamped on the markings in Versamark Ink and then heat embossed with gold embossing powder. I cut out the butterfly with the coordinating die and then I creased it down the centre to give it some added dimension, placing 3 self adhesive pearls down the body, and then set it aside.

I made a 5.5 x 5.5 inch card base from ivory cardstock, and then cut a piece of 'Just love me' patterned paper a little smaller.  I cut a second piece that was smaller again by about half and inch or so and inked and distressed both pieces.

I cut some of the pink paper out with an old LDRS die Lovely View, grabbed some embellishments and started putting my card together. 

I've listed all the items I used from The Ribbon Girl below, along with links to the items in store.


That's all from me today, but I'll be back tomorrow with some more MFT inspiration.

Thanks for dropping by!


Monday, 19 June 2017

Holiday Cheer

Hello!

I thought I would kill 2 birds with one stone with this card. 1 I would get another Camp Create class done and 2. In the process I'd check off another elusive Christmas Card lol.

So this is my card for the fabulously titled class- Spectacular Shakers.

If you want to join in with this class, there's still time and you can find it here


I used one of the little penguins from the Toasty Greetings stamp set (my daughter loves penguins so I do try to use some), stamped him out on Strathmore Bristol Smooth paper with Versafine ink in Onyx Black.

Than I coloured him in with my zig markers and cut him out with the coordinating die.

The background of the shaker window is meant to be reminiscent of an igloo wall. I used the English Brick stencil and some blue shades of ink with my Clarity stencil brush for some soft tones. 
Unfortunately the die I cut my aperture with is no longer available from MFT, but you could use an ordinary circle die instead if you don't have something similar.

I used a mix of the Lucy's Lagoon Sparkly Shaker mix and some white sequins from my stash.

The large rectangle die is from MFT Blueprints 15 and the smaller one is from MFT Blueprints 20.

I finished off with a small banner and a little charm and twine.

This is the badge earned from the Spectacular Shaker class.

I hope you enjoyed my card and thank you so much for visiting.


Sunday, 18 June 2017

Fairy Shaker at The Ribbon Girl


Hello!

We have a new challenge up over at The Ribbon Girls and as always for our second challenge of the month, it's
Anything Goes with an Image

I made a sweet little shaker card with the new Fairy Happy stamp set from MFT Stamps. I kept the colouring very simple as tbh I'd forgotten the challenge was this weekend and I was in a little bit of a rush lol. The dies used are all MFT apart from the little tag, and that die and stamp is from Mama Elephant.

I used the following Ribbon Girl products to complete my card:


I do hope you can join us, there are the following lovely prizes up for grabs:

First prize:  £10 voucher for LOTV

http://www.liliofthevalley.co.uk

Second prize:  £10 voucher for The Ribbon Girl

http://www.ribbongirl.co.uk/catalog/index.php

Third prize:  A lovely prize from Marianne Designs


Thanks for dropping by!

Tuesday, 6 June 2017

Lollipop Shaker Card

Hello!

Something a little different from me today and a bit of a change from all the CAS cards I've been posting recently.
I've been meaning to try my hand at a lollipop or wand card for ages, and the other day when I had a bit of spare time I decided to have a play.

I didn't do the concertina bit this time, because I had this fab gathered tulle that worked very well in it's place, and I used some fancy doily type die cuts for my layers. I also decided to make it into a shaker card for a bit more fun, it would be great I think to make one of these like a rattle for a new baby card too.


They aren't the easiest thing in the world to photograph, but I did my best for you.


I've listed all the items used below, along with links to any Ribbon Girl items that will take you straight to the item in the shop.

Plain Pink Cardstock
Pink Gathered Tulle Trim
3 mm White Pearl Bead String (coloured with Copic Ink)
Lucy's Princess Sparkly Shaker Selection

I also used a Whimsy Stamps from the following set:

That's all from me today, thanks so much for visiting!


Sunday, 7 May 2017

Rose Scent Tilda for The Ribbon Girl

Hello!
I'm here with a DT post for The Ribbon Girl.

It's been rather a long time since I coloured up a Tilda, I've almost forgotten how lol, 
so I thought I'd have a play with Rose Scent Tilda.

I don't find red the easiest to colour with distress inks, if you aren't careful it looks pink and if you try and build too much depth it can bleed very easily as it's highly pigmented, but it didn't turn out bad today.


The papers are old ones from the Siri's Kitchen collection and I thought this kitchen tile design could easily give the impression of bathroom tiles which then tied in with my image.

I used lots of yummy embellishments from The Ribbon Girl and I've listed them below with links to take you directly to them in the shop.

6 mm Pearl and Diamante S/As

That's it for this morning but I'll have a little something to share with you later today.
Thanks for visiting!


Sunday, 23 April 2017

Whimsy Stamps - Wee Stamps - Freesia

Hello!

Now I have some free time and the internet seems to be behaving a little better, I'm catching up on some makes from the last few weeks.

This post also serves as a reminder for The Ribbon Girl  April Use Any Image Challenge.

You can find the challenge here, and you still have a week to enter your project, you make any project as long as it has an image on it.

My card today uses Freesia, from the Whimsy Stamps, Wee Stamps collection.


This cute little bunny was released in March and although it was perfect for Easter makes, I think it works just as well for birthdays and other occasions. So a birthday card is what I made using a sentiment from the newly released Vintage Birthday Frames Sentiment collection from Whimsy Stamps.

I coloured my little bunny with my distress ink markers.

I also used the following items from The Ribbon Girl


That's all for today but I'll be back again tomorrow, have a great Sunday!


Sunday, 2 April 2017

Sending Love

Morning!

It's time for a new challenge over at The Ribbon Girls' blog, and as I missed my own team's 'Any Image' challenge in March (I won't be sorry to see the back of March, it's been exhausting!), I thought I'd join in with a DT make for this month's Card Challenge also.

So this is my make. 
I made a 5.75'' by 5.75'' ivory card base and used some lovely papers from the Lemoncraft House of Roses pad, which I inked with Walnut Stain DI and distressed.

I painted the chipboard frame with some liquid pearls to give it a lovely shimmer and shine, though you can't really see it well in the photographs. I see that Mary is now stocking this in a gold colour too, so I will have to try that.

I stamped out 2 butterflies and a sentiment from the Whimsy Stamps - Flight of the Butterflies clear stamp set with Versamark ink on some vellum, and heat embossed them in gold.

I fussy cut the butterflies and cut out the sentiment with a fishtail banner die.


I cut out a circle from the base paper and popped that up on the doily with some craft foam and adhered to the centre of my card.
After positioning my sentiment, I hid the glue beneath the vellum with some flowers and a little bling. I've listed my embellishments below with links to the store.

15 mm Gold Diamante Flat Back

I do hope you can join in with our challenge, there are lovely prizes to be won, and don't forget to go and drool over the rest of the lovely makes.

Thanks for dropping by!

Sunday, 19 February 2017

Braided Sweetie


Morning!

I'm ever so slightly late with this post, for some reason I had it in my little head that I was due to make my card for the 
Anything Goes with an Image challenge at The Ribbon Girl
next Sunday....oooops!
I'm not normally so confused but last week was fairly stressful, including an interview for the job that I've been doing for the last year! I'm pleased to say that I was successful, so that's one less worry lol!

Sooooo there was a lot of blue air and a very busy me yesterday getting everything ready in time. I got my card made, photographed and blogged in good time yesterday, but forgot to hit publish after I scheduled here, so I'm a couple of hours later than normal.

Anyhooo....on to the part you're here for, the card.

I used one of the new releases from Whimsy Stamps called Braided Sweetie, from our new artist 
Kirsten Winkelbauer isn't she pretty?


Not my best colouring unfortunately as I was in a mega rush, but I do like the finished card.

I used the following distress ink markers:
Vintage Photo, Antique Linen, Walnut Stain, Spun Sugar, Picked Raspberry, Bundled Sage, Mowed Lawn, Black Soot.

I've listed all my products used below, with links for most.

From The Ribbon Girl

Other Items Used
Smooth White Cardstock
Langton Hot Pressed Watercolour Paper
Versafine Ink Onyx Black

I so hope you can join in with our challenge, there are some lovely prizes to be won

First prize:  £10 voucher for LOTV
http://www.liliofthevalley.co.uk

Second prize:  £10 voucher for The Ribbon Girl
http://www.ribbongirl.co.uk/catalog/index.php

Third prize:  A mystery prize from Marianne Designs
.

I do hope you can join us, don't forget to check out the rest of the team's lovely makes also!

Thanks for dropping by!


Sunday, 12 February 2017

Happy Mother's Day

Hello!
I thought the Happy Sayings die and sentiment set would be perfect as the focal point for this mother's day card, which falls a little earlier over here in the UK than it does in the States and some other countries. I think it looks so pretty paired with this paper from Lemoncraft. There's not too much of this left in stock, but I think that the new Gossamer Blue pad, would look equally as pretty, I just didn't have any of that one (yet lol!).


From Whimsy Stamps

From The Ribbon Girl
The large white lilies are no longer stocked but these would work well 

I hope you like my card for today and I'll see you soon.

Thanks for dropping by!

Monday, 30 January 2017

Snow White

Hello!

It's been a couple of weeks since I made a card with a coloured image, and even loooooonger since I had a play with a Saturated Canary image, what's more I had NEVER inked this stamp Snow White up. So I thought it was high time I rectified all that and coloured her up with my distress ink markers to match these bright and happy papers from Kaiserkraft.


The ribbon, lace, apples, rose and blossoms are from The Ribbon Girl and all the rest is from my stash.

I'm afraid I didn't note all the colours I used but the skin and hair were Vintage Photo, Hickory Smoke and Black Soot and the clothing was Candied Apple and Cracked Pistachio, Pumice Stone and Crushed Olive.

Thanks for dropping by and I'll see you soon.

Sunday, 15 January 2017

Mistletoe Fairy with a Twist

Hello!!

It's Sunday again already, (and halfway through January too, eeek!), I thought I'd petition Old Father Time to slow things down a bit... maybe just for the weekends....perhaps the evenings too. Hey if he wants he can speed up work days a bit to make up the difference! I have the best ideas don't I? 
Of course he hasn't relied to my email as yet....maybe he's still sleeping off the New Year celebrations.

Anyhoooooooo...
Since it's the 3rd Sunday in the month, that means it's time for a new challenge at 

As usual we want to see any projects you make, as long as they use an image on them.

For my contribution this week I used the lovely Mistletoe Fairy from Whimsy Stamps.
I fell in love with this as soon as I saw her and coloured her up straight away in Winter Mode. But I thought to myself, why limit her to Christmas and Winter cards? It seems such a shame to leave her in the drawer after Christmas.
So I had a little play and coloured her up with some summer colours where her Mistletoe became pretty pink berries.

What do you think?

I actually used some of my Precious Maja Design Vintage Summer Basics 1933 for this. I only have one sheet left now and I will be so sad to see it finished as I can't get it anywhere now and I love the mix of aqua and pink.

She's coloured in Distress Ink markers to match the papers and I used the following colours:
Tea Dye, Vintage Photo, Spun Sugar, Victorian Velvet, Broken China, Tumbled Glass, Bundled Sage and Picked Raspberry.

Products Used:

Cheesecloth
15 mm Pale Pink Satin Ribbon
20 mm Sylvia Pale Aqua Lace
6 mm Ivory Pearl Trim
Ivory Magnolia Flower
Beaded Cherries Pink
20 mm Ivory Open Rose
10 mm Ivory Open Roses
Miniature Pale Mint Blossoms
Hip Rose Bud Cream
Rose Leaves - Green
11 mm Ivory FB Pearls
8 mm Ivroy FB Pearls
6 mm Ivory FB Pearls

I do hope you can join in, you can win some lovely prizes from our sponsors

First prize:  £10 voucher for LOTV
Second prize:  £10 voucher for The Ribbon Girl
Third prize:  from Marianne Designs

and don't forget to ogle the rest of the team's gorgeous makes!

Thanks for visiting

Sunday, 8 January 2017

Heart Painted Birthday

Hello and happy Sunday to you all.

I'm here with some Ribbon Girl inspiration for you today.

If you haven't picked up one of the Hearted Painted paper pads  yet you don't know what you're missing. Truly the papers are so beautiful so I didn't use a stamped image as I wanted to let the papers do the talking and just complimented them with some beautiful embellishments.
 I made a softly shabby floral card.


I softly distressed the edges of most of my papers but didn't ink them this time as I wanted a cleaner look with this one. The decorative edges are cut with a Spellbinders border die.
I used the following products from The Ribbon Girl on my card today

Lemoncraft Heart Painted 6 x 6 Paper Pad
Pale Lime Green 15 mm Satin Ribbon
35 mm Medium Pink Trellis Rose
10 mm Pale Pink Open Roses
20 mm Pale Pink Open Roses
Hip Rose Buds
Rose Leaves
6 mm Ivory Flat Back Pearls
11 mm Ivory Flat Back Pearls

The little sentiment is from Mama Elephant as is the little tag die, you can buy both of these at Dies to Die for in the UK.

For the perfect finishing touch to my card I used one of the beautiful butterflies from Kay Fatula's shop.

That's all from me today, enjoy the rest of your weekend!